Project Whurple - White/Purple Watercooled Build - Changes to 3d printer build!!

Arguably even more fun without a manual!! Good luck!

Exactly... Still waiting on parts for Whurple but my chairs arrived from Germany in a record 3 days!! 2 of these bad boys! Super well priced and great quality :D


Not sure what I will get done today now but I have been really productive, built the two chairs, mowed the grass front and back, washed the 3 cars and have done a bit more pottering about. Loving the weather :)
 
A very productive day! Chairs look banging, you say you chinned off the original company you got them from in the end? Weather has been great! I guess we are really into the waiting game now. I'm waiting on a refund to come through before I pull the trigger on buying the rest of my build. Still toying with a few parts here and there, so I'm not in too much of a rush.
 
A very productive day! Chairs look banging, you say you chinned off the original company you got them from in the end? Weather has been great! I guess we are really into the waiting game now. I'm waiting on a refund to come through before I pull the trigger on buying the rest of my build. Still toying with a few parts here and there, so I'm not in too much of a rush.

I did indeed. I bought 'them' from staples 3 weeks ago for about £60 a chair then watched them creep up in price after my order for 3 or 4 days before they were taken off the site. I rang them 3 times over the course of 2 weeks and was eventually told the earliest I would get them was June/July and that it was the 'Vendors' fault. Not really satisfied with that I did a reverse image search and it turns out the same chair goes under many different names. So I found the cheapest one at 58 euros each with shipping, I then called the company and they confirmed the website was correct and that they had stock and it would be shipped within 24 hours so I pulled the trigger and here they are. This is a lot better than sitting on what I was sitting on. One of my cats "Mr Ghandi" has now claimed that!

What is it you are building? :)
 
That's some smart thinking! Impressive at that price including shipping though.

I'm long overdue an upgrade so thought I'd spec out a machine and use this isolation time to just go for it. I know that the new CPU's and GPU's are on their way but the delays kind of made me think it's worthwhile doing the upgrade now. I missed out on a GPU upgrade because when it was time the mining boom kicked off and prices went through the roof. So I've kind of missed an upgrade cycle or two.

So far I've bought a monitor and graphics card, making the move from 1080p to 1440p but the little 560 Ti isn't enjoying itself and I've been crashing a few time. The speakers make a noise then the whole thing just locks up. I'm hoping adding the new graphics card works well until I buy the rest of the stuff. But all this PC shopping is a minefield.

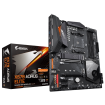
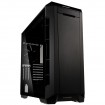
Was going to get the Phanteks P600s with a B450 Mobo but realised not many mobos have USB3.1 Gen 2 headers so I can either

1. Stick with the B450 and not plug in the front USB C port
2. Stick with B450 and change the case
3. Try and find a Mobo with the internal header, can only find some x570 boards at the moment

I picked up 3 x 140mm Corsair fans on the MM so I want to be able to fully utilise them as well which is making me a bit picky about cases too.

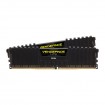
I'm also debating if I go 16GB high performance RAM Patriot stuff or there is some Crucial 3600MHz CL16 available as well.

Feel like I'm going round in circles!

Here's my basket so far anyways: -

My basket at Overclockers UK:
Total: £1,106.89 (includes shipping: £0.00)
 
That's some smart thinking! Impressive at that price including shipping though.

I'm long overdue an upgrade so thought I'd spec out a machine and use this isolation time to just go for it. I know that the new CPU's and GPU's are on their way but the delays kind of made me think it's worthwhile doing the upgrade now. I missed out on a GPU upgrade because when it was time the mining boom kicked off and prices went through the roof. So I've kind of missed an upgrade cycle or two.

So far I've bought a monitor and graphics card, making the move from 1080p to 1440p but the little 560 Ti isn't enjoying itself and I've been crashing a few time. The speakers make a noise then the whole thing just locks up. I'm hoping adding the new graphics card works well until I buy the rest of the stuff. But all this PC shopping is a minefield.

Was going to get the Phanteks P600s with a B450 Mobo but realised not many mobos have USB3.1 Gen 2 headers so I can either

Doesn't 3.1 gen 2 have the same header as gen 1 and you can just plug into that? Or am I missing something?
Also I would go with a seasonic supply at that money i'm sure my 750 platinum and my 860 platinum were around that and have been faultless. Cool build though :)
 
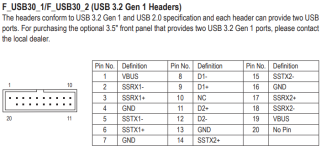
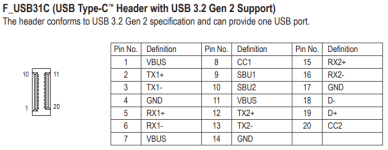
Ah apologies it's USB Type C header with USB 3.2 Gen 2 Support which is different from USB 3.2 Gen 1 Headers.

Below is taken from the x570 AORUS Elite Manual:-

LPUmV3l.png
dOXy75t.png

Which isn't as common as I thought unfortunately.

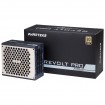
Ah thanks, the Phanteks PSU is made by Seasonic and has a 12 year warranty. The platinum ones are a lot more expensive at the moment, not sure if prices have spiked or something but I'll keep and eye out as I still have time. I'm not that precious about PSU's just want something with a reasonable warranty as my Corsair one has expired eek! Cheers! :)
 
@LePhuronn Do you think you can help me? I am just about to set off my first print and I think I have ABS. What temprature should I set the bed to? also what sort of temp should the nozzel be for that? Ive managed to get it all set up in Cura and Cura is detecting the tempratures of everything. I spent an hour or so last night trimming it with a sheet of A4 paper and adjusting the bed etc.

Really I think all I need to really know is what sort of temps I should be working with :)
 
I'd be surprised if it's ABS. Unfortunate too because ABS needs some extra work because it's very sensitive to ambient temperature, so you need an enclosure for the entire printer.

Assuming it's actually PLA for now, a good starting point for me was 200 nozzle, 60 bed just to test adhesion and correct tramming of the bed. From there you can experiment with bed temperature to eliminate "elephant foot" (where the bottom couple of layers squidge out in a little chamfer which affects total layer height and Z accuracy) and to fine-tune what your particular filament likes to cook at.

I'm using Creality brand PLA and I'm running 200 nozzle and 50 bed, and only need to use a brim support for thin and tall prints.

If it really is ABS though, you're looking at 220 nozzle, 65 bed and enclose the entire printer to keep the warmth in. ABS also stinks so you'll benefit from ventilation once you open up the enclosure. Enclosures can just be a big cardboard box than will sip over the entire unit, but with that you can't see what's going on :p also the electronics shouldn't really be inside the enclosure, so if you do a lot of ABS it's always good to make up a proper enclosure with acrylic sheets (there's a ton of stuff using Ikea "Lack" tables and printed joints for the Ender 3 printer) and route the control boards outside.

Fingers-crossed this is just PLA though. Unless you buy a spool of it.

It's pla and I have had the bed at 70 and yes am getting the elephant foot on my first test print. I have the nozel at 185 and bed at 70 but so far I have managed to print a thing which is awesome! I'm going to have to test it out with some of the davinci stuff on thingverse and really get it tuned in. I might print a couple of support brackets i'm mocking up to hold the machine nicely in place first. Next job find a permanent home for printer. I'm thinking some sort of nice table I can put beside the desk to secure it to.

I was sending a mate of mine videos as I was going and i have managed to damage the bed with the nozel :) The video is a classic, I start off all smug and it goes downhill quickly :) it's all good fun though, I can take it off and give it another lick of paint at some point.
 
If you're not getting under extrusion then your 185 nozzle shold be fine, but get that bed down. Hell, I've printed PLA on a Makerbot with no heated bed.

On Thingiverse, grab yourself a calibration cube so you can test 3 axis dimensional accuracy. Also try a free air extrusion test to calibrate your esteps (I'll try to find a link later if your Google Fu fails you).

Sounds like you're off to a good start though!

I shall get myself a cube and see what it does. The machine needs to be secured really as it moves about quite a bit and it clearly doesn't help the prints. In the layers where I held it in place it seemed to be a lot more accurate. Nobody wants to be holding something in place though. I also massively need to clean up wiring, adjust the stupid location of the rear backstop so it is central to the plate (i'm going to print a bracket) as when the plate goes back the force of the plate to the side forces the machine to move, somebody will tell me there is a reason for this but I disagree and think they just wanted to keep the costs low as relocating will mean extending wires. There are so many more things that it really needs but I guess that's sort of the idea, for £75 you get a crude kit that will do everything you need but if you want it to be good you got to put in the work.
 
https://www.thingiverse.com/thing:1278865

Calibration cube. Print it, measure each dimension, adjust esteps for the 3 motors accordingly to tune in. Might want to address the elephant foot first as that will affect your z height before anything else.

I shall print that bad boy at some point. I wan't to do some more work on the area the printer is going to be etc and make sure it is properly secured before I start going mental. All this holding it and poking it and dragging it around on a makeshift table isn't what you need. I got wood so perhaps tomorrow ill construct a table or something.
 
https://www.thingiverse.com/thing:1278865

Calibration cube. Print it, measure each dimension, adjust esteps for the 3 motors accordingly to tune in. Might want to address the elephant foot first as that will affect your z height before anything else.

Printing the calibration cube now. I still have the first few layers sort of not in line with the rest of it. Ill do a pic of the cube once it is done and would appreciate any help you could give me.
 
That looks like layer shifting on the y axis, either from a slippy belt or too much friction on the wheels.

Check the belt for the bed motor is nice and tight and all three axis run smoothly by moving them manually (either with the printer off or disabled stepper motors) - you should feel very little resistance as you move the gantry and bed (don't do it too fast or you generate a feedback current into the control board), and nice and easy rotation as you turn the z screws.

But at least you have good adhesion at 50 degree bed with no elephant foot!

Going to try a half size scale one now with some adjustments. Thanks for the pointers. Will report back!
 
Back
Top Bottom