Rise of the triad, The 2014 Area 51

Soldato
OP
Joined
23 Apr 2010
Posts
11,890
Location
West Sussex
OK so pretty much everything is here now. I am still waiting on some blue tint but that may not even end up getting used.

Today the vandal switches arrived from HK (£3.80 the pair, they're four times that EACH from UK vendors) and they're pretty snazzy. So I could finally cut the holes into the side panel to hold the switches. However, I had been very nervous about this because the outer skin is made from plexi glass and not acrylic. It tends to crack and split extremely easily. Thankfully though it was one of those jobs that just worked first time - phew, I'd put hours into that panel !


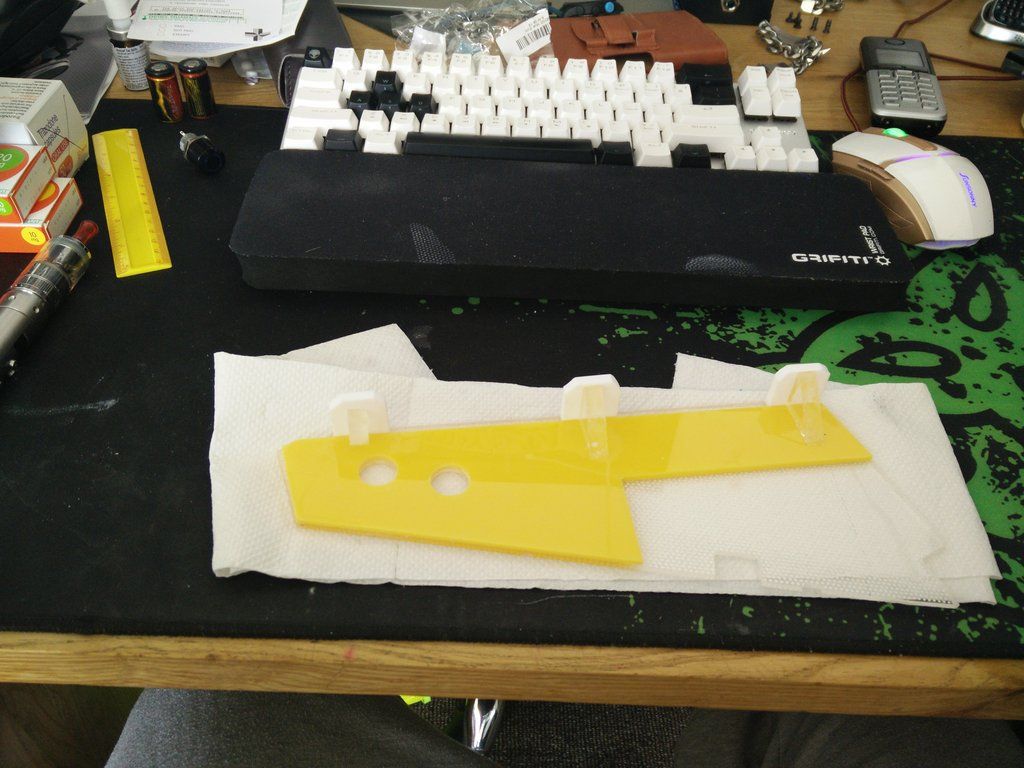
As you can see the final struts have also been cut and welded on. It should now be able to carry the quite heavy top panel without anything breaking off.

Here are the switches in situ.


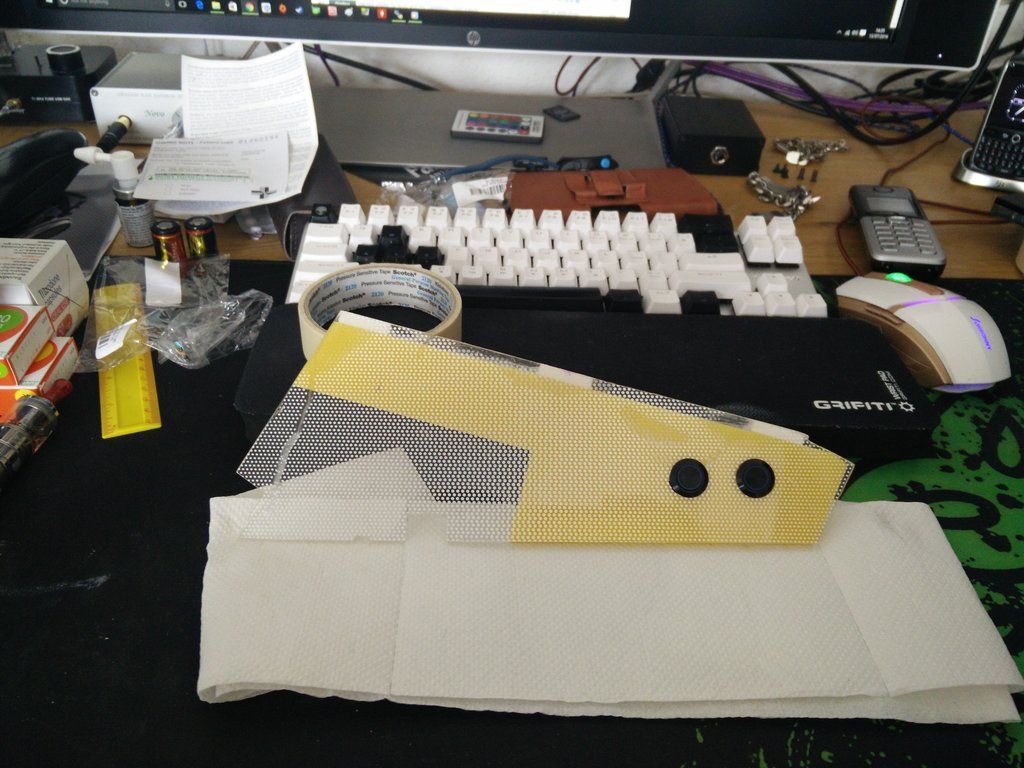
They light up too, very happy with those ! and of course the finished SSD-UFO.

 
Soldato
OP
Joined
23 Apr 2010
Posts
11,890
Location
West Sussex
Today I finally did some rewiring inside the PC and straightened up the cables. They're all on cable ties ATM until they stop fighting or, end up being shoved into a channel that will hold them straight regardless.. Here is the top panel WIP so far, I've mapped out the areas that need to come out and drawn the cut hole for one of the cable management thingers.


And here you can see what I have done. Trim off one side by around 4mm then I will trim it to fit and glue it in once it's all painted.


Still lots to do because I had an idea that I want to basically sink the cathodes into the lid so they are flush and don't stick out. Shouldn't be too hard, just cut holes big enough for them to fall into then weld in some supports.
 
Soldato
OP
Joined
23 Apr 2010
Posts
11,890
Location
West Sussex
Last update of the day ! So I have now finished marking up the top panel. I made a couple of mistakes so I waited until everything was final then coloured in the areas to be cut with a sharpie (hence why I have stuck labels on it's easier to mark).


(complicated part).

OK, so as you can see I am going to cut rectangular holes in which the cathodes will be sunk so that they are flush. Problem is the blade I use to cut acrylic (diamond coated) is wider than the 13mm hole. So I am going to have to over cut the ends meaning I will need this.


And some spreaders.


And finally some double sided tape. I decided I am going to take the SSD UFO apart and make some changes to it.


I will probably start cutting tomorrow.
 
Soldato
OP
Joined
23 Apr 2010
Posts
11,890
Location
West Sussex
Hi. I'm cutting with diamond coated discs, just like this.


They cut very quickly and I then put a piece of sandpaper on a board and press down like that to sort out the edges :)

I cut out the floor pan earlier.


Ignore the rectangular holes, you won't see those :)

I'm absolutely knackered but very happy. 12 hours straight modding and my floor panel is almost complete. I'm very happy with how it turned out, as you will see over the coming days :)
 
Soldato
OP
Joined
23 Apr 2010
Posts
11,890
Location
West Sussex
What are the mini circular saw blades like? Looked at them thinking they were brilliant and then read the reviews saying people kept shattering them and possibly loosing fingers/eyes/limbs/credibility and gave them up as a bad idea. Are they any good when not used by clowns?

They're absolutely awful. They just keep jamming. Instead of cutting the acrylic or plexi and throwing off swarf (another word Chrome doesn't understand, tchoh !) they just melt it and make a right mess. The diamond blades go through acrylic like a hot knife through butter, throwing out like a powder and leaving a nice clean cut. I can see why they would shatter plexiglass (it's harder and more brittle than acrylic) but yeah, they're seriously not good. Total waste of cash.

I have the main structural work done on the base plate now. It doesn't really look anything like it looked in that pic I took.. There are a few over cuts I need to fill with the filler but nothing too serious. The rectangular holes are now completely covered and the cathodes will be hidden underneath.

I will explain it all tomorrow when I can take some pics :) I should also be able to start prep tomorrow. I have one more panel to cut and then it's all prep work before I begin painting some time next week :)
 
Soldato
OP
Joined
23 Apr 2010
Posts
11,890
Location
West Sussex
OK so here is where I am now after going to bed at 1am and then getting back out of bed at 2:30 to complete the structural work on the box.


Now you can see why the rectangular holes do not matter. They are only there to allow the 6" cathode lights to sink through completely. You will also notice there are two pieces welded to the top. That now looks like this.


I originally planned to do this in one piece and to wrap around the cable grommet hole too but after spending a couple of hours designing things in Photoshop I decided on separate parts. Now you will note that the two strips are masked? that's because everything else you see will be painted apart from the very tops leaving those clear. I wanted it to be very *very* subtle as cathodes are like RAWR IN YOUR FACE so this was how I designed it.


There will only be a 3mm strip letting the light through. And going on top of them when it's painted will be these.


Basically I printed 2 off. One in black (to use as a cutting stencil) and one in the black chrome I mentioned earlier in the thread.

Later today I will be starting the 2-3 days of prep. Then I will fill, prep some more and keep working on cranking out these cover panels (two more to go at last count).

One I start getting paint on it will actually start to look like something :)

Oh yeah, and I buzzed the vandal switches last night and mapped all of the pins. No documentation pfft.

Oh yeah forgot to explain how the lights fit. At each end of the rectangle underneath I have welded on a post. This sinks them down flush so later today I will be doing all of the drilling/tapping (that's why it's taped together like that).
 
Soldato
OP
Joined
23 Apr 2010
Posts
11,890
Location
West Sussex
More work done. I was kinda hoping that the M3 tap I bought would be good enough to tap the holes for the bolts but sadly it didn't want to play ball. The hole ended up so large the bolts just fell through. After a lot of thinking I decided to use a trick that Dan posted about a while back where he was using heat to force in motherboard mounts. You drill a small hole, then heat a bolt up and basically push it in. Then you leave it to set. The only method I had of doing this was a soldering iron and a small bolt but it worked a treat ! first up those lovely bolts I bought.


And with them fitted.


Sadly I forgot that I had to do four more holes underneath to hold in the cathodes. Talking of which here is how that works. You can see there are four standoffs that lower them down inside.


There's also a strip in there to reinforce the weak parts :)
 
Soldato
OP
Joined
23 Apr 2010
Posts
11,890
Location
West Sussex
I used a test piece first with a 3mm drill bit. It fell through. So I tried a 2mm bit and by the time the hole was cut the screws fell through also. I even tried it with no drill hole (don't recommend, takes ages and you need arms like Arnie) and again it just fell through.

I dunno man.

Doesn't matter though. My heat method using a 2mm hole, a m3 screw and a soldering iron works brilliantly. You just melt it into the hole then let the hole set around the threads of the bolt :)

I started prep a little while ago. I have done about 50% of the side panel. Looks so much better with all of those stupid dots sanded off and that massive plastic weld run :D

It's all prep now. Lots of it too. Once the panels are all sanded then I will be staying with my mother for a week or so to get them all painted. I've got to go plastic primer sealant (clear) then onto primer and then finally onto the paint. So it's going to take a while.

Later I will probably make the holes for the cathodes, then sand that panel down ready for filler (the top panel). I also have three small panels to cover wires etc two radiator covers a large PSU cover panel and a side PSU cover panel. Lots, basically :D
 
Soldato
OP
Joined
23 Apr 2010
Posts
11,890
Location
West Sussex
OK so the cathode screw holes have been done and I have test fitted them.


Flipping them over isn't very exciting yet. Like everything else it will look like complete ass before it is finished.


What I can see though is that light penetration is very good, it's even going through the masking tape. This means my 3mm lines will glow up nicely without being too in your face.

As you can see prep has also begun. This panel and the top panel will need the most work. This one is about 70% there I just need to sand out some plastic weld drip marks (very small)

 
Soldato
OP
Joined
23 Apr 2010
Posts
11,890
Location
West Sussex
It's looking good so far. Sleeving looks nice.

Tap could possibly be an issue starting it - assuming it's not just rubbish/mislabelled size. There are two or three different types with different names depending on who's trying to confuse you. There's a bottom tap (no, really) for getting a thread to the bottom of a blind hole (rather than a through hole) but it's no good for starting. There's a taper or first tap which is, surprise, tapered. Good for starting the thread and if you can go all the way through, find to finish it. I suspect some may be to thin with the expectation that you then use an intermediate tap which is partly tapered.

Glad the heat method worked. Just on the off-chance you need to do it again.

Thanks for the information there fella I appreciate that ! I will admit to being quite green when it comes to things like tapping etc as I've never really needed to do it. What I do know is that I only bought one tap and that you are supposed to use three? something like that.

Thing is the melt method is perfect because it literally seals around the thread perfectly. I only need to do three more holes (you will note one screw is missing on the cathodes, I marked it wrong) so I'll just use the melt method :D

I need to make two supports today that will hold up the face panel (the yellow and clear one). Then I need to drill through it so the panel can bolt into the bottom of the rig nice and firm. I will probably stick the supports in with double sided foam as I don't want to cut drill or alter the case in any way. Once that's done I can really crack on with the prep work :)
 
Soldato
OP
Joined
23 Apr 2010
Posts
11,890
Location
West Sussex
OK so today I have been making support brackets and melting screws into holes. Doesn't look like much but took a couple of hours.


And then "tap" the bolts in.


And a quick test to make sure everything lines up and everything bolts in as it should.


All fits as it should, sweet ! so I've broken it down ready for prep :)
 
Soldato
OP
Joined
23 Apr 2010
Posts
11,890
Location
West Sussex
Finishing the LED-UFO. It took a while.. First I had to solder resistors to each LED then fit the little voltage controller.


It was a little complicated but I got there in the end :D


Quick test.


And then I left it running for a couple of hours to make sure it was safe. I was worried it might get hot as the voltage reducer is resisting but it seems fine. I mean a little warm but thankfully there are lots of ventilation holes in it any way.


And I'm very happy with it :)
 
Soldato
OP
Joined
23 Apr 2010
Posts
11,890
Location
West Sussex
Haha another 13 hour day :S I just have so many things to do. Nuts !

Any way I decided to partake in some graphics this evening. Firstly cut a cover for the freshly peeled SSD (note, photos are manky 'cause the light is gone)


Nice and simple. This is the first test of the black chrome and I gotta say, I love it ! it's virtually invisible without light. Like a really dark gray. As soon as the light hits it though it comes alive. Couple of pics, but as I said they're not all that clever due to the light.


And with some light and reflection.


Very happy with that :)
 
Soldato
OP
Joined
23 Apr 2010
Posts
11,890
Location
West Sussex
I feel your pain dude. Many years ago I bought an Area 51 ALX case that was missing the IO board. It's where all of the LEDs connect up to. Basically they come in on two 24 pin ribbons and plug directly into this board.. Any way, I decided I wanted two of the few possible colours so I ended up wiring up around 20 or so LEDs so that I could switch them between purple and green.

It took me about three days lmao. Worked though !

I don't usually mind soldering. It's pretty relaxing like braiding and I can just put on some music and kick back and just go into repetition mode :D
 
Soldato
OP
Joined
23 Apr 2010
Posts
11,890
Location
West Sussex
BTW just a quick note. You will notice that I am using what Alienware call "Alien Caret". It's hieroglyphics but does have a symbol per letter of the alphabet.


It will help to translate the messages and labels. First one is easy, the SSD. Yes, I do have a sense of humour :D
 
Soldato
OP
Joined
23 Apr 2010
Posts
11,890
Location
West Sussex
OK so today's main log. I was quite fortuitous to discover that anything you design in millimeters in Photoshop are spat out at the exact size of design when taken into the plotter software. This was a huge discovery, because it meant I could have things on the PC in realtime knowing exactly what they would look like and best of all, I would be able to design whole pieces and then cut the graphics separately.

So here was the procedure I followed today. First of all I scanned in the panel I wanted to do some design on.


And lifted it as a layer making a new background in green. You'll find green is the best colour to use for this (they use it making movies and games also).


I then cut away everything leaving the shape in place.


So now I had my shape. I then added a colour overlay.


OK so now it's black.


Only problem is because it's a scan it's been flipped. So I flipped it both horizontally and vertically.


I then needed the exact dimensions. To get the width I did this.


For the height I simply measured from the bottom to the highest part. Now to turn it around.


And it looks as it should. I then began the design process.


And where I am up to.


And because it's in scale I can design it nice and big (to get the small details in nice and sharp) then at the end resize every layer and throw them at the plotter.
 
Soldato
OP
Joined
23 Apr 2010
Posts
11,890
Location
West Sussex
OK so prep has begun. I spent a couple of hours last night sanding. Still got another couple of hours to do but I am getting there slowly.


Nothing terribly exciting really. Just lots of work. Any way, I placed a ton of orders recently for modding parts I needed for the project. This was one of them.


It arrived this morning. Then I dug into my wire bin (yes I actually have a huge plastic container filled with wires lol) and found these.. The Area 51 needs a single Molex to power up the internal light controller and so on and I chopped it off so it was nice and tidy :D


Which among the pile was these.


So I had the parts I needed all along and could have done this days ago /facepalm. Any way I did need to harvest some male pins.


I then set about making some wire lengths.


And set about soldering the loom.


It's nothing terribly exciting. Just two 5v + lines and two 5v - lines for the switch LEDs (they light up) and then a switched 5v line for the SSD UFO and a switched 12v line for the floor pan cathodes. I want to be able to switch off all of the internal LEDs and lights as there's no point in running them with the case closed.
 
Soldato
OP
Joined
23 Apr 2010
Posts
11,890
Location
West Sussex
Ugh. Very.Warm.

I did manage to finish the prep on the top panel though. It's all sanded, filled, sanded again and then smoothed down for pre primer.


Unfortunately this is where it ended. I was simply too sweaty to continue. I think I've done all of the jobs that don't require anything physical too. Maybe I will just continue on with the decal work and then eventually get fed up and just get up and walk to the sea and go in for a bit.
 
Soldato
OP
Joined
23 Apr 2010
Posts
11,890
Location
West Sussex
No idea how you managed anything in heat like this. Nice work though

I took the gear into the kitchen and set up a washing up bowl I'd bought for wet sanding and started at it. I think I lasted about 40 mins before realising I had better stop.

Not done a sausage since. Hoping it cools down a bit later as I'm still not happy with the side panel. There's a scar along the edge from the Dremel and I want it gone.

Definitely! Took the day off (I was working all weekend) and too wife and child to the sea. Nice but packed with other people - unsurprisingly!

Panel is coming along nicely. Sleeved cables look good.
My RGB LEDs turned up yesterday and I wired one up to test. Turns out it's not the same pinout as others (and none provided) so I've got blue and green swapped :rolleyes: at least I found out after one!

For the time being I live literally 100ft from the beach. The winters are torturous but we get payback *IF* summer is good. A couple of years ago it was just immense !

We're going to be leaving soon though (landlady selling up) which sucks but at the same time it's a blessing. Honestly, living that close to mother nature during the winter really sucks.
 
Soldato
OP
Joined
23 Apr 2010
Posts
11,890
Location
West Sussex
Good afternoon all. This will be a picture-less update but an important one all the same. So basically I got the build to the point where I only had prep left to do. I managed to knock out nearly all of the prep before the heat hit but as soon as it did I just ended up a sweaty mess within minutes of starting so I decided to take a couple of days off to relax, sit in front of a fan etc. However, I have been beavering away creating watch lists and so on of everything I will need to finish the project. The list has grown quite long, but I thought I would share it with you guys so you would know what you needed if the need arose.

OK, so here is what I need. I will be ordering them later tonight and expect them to arrive next week. Once they do I will be staying with my mother so I can use her garden.

Heat shrink. I need this to complete the loom for the lighting and switches ETC.


OK now painting supplies. I figured I would list these and explain what they do as Dice said he wanted me to run through the paint process. First of all you obviously need sand paper, filler etc but there are a few other things that are important. Once you have prepped your parts (sanded and cleaned in soapy water) you then need to clean them with alcohol before you paint. This removes any hand oils, hand cream, soap deposits etc.


Now on metal and so on you can use an acetone based cleaner like "pre paint" but sadly that will just eat plastic so you need to use alcohol instead. I will be using these cloths.


Not the cheap Ebay "lint free" cloths. Whilst most of them are nearly lint free there's no such thing as an absolutely 100% free lint cloth. So once the panel or part has been wiped down you need these.


Tack cloths. Basically sticky cloths that will remove anything that is left after cleaning (like lint, ants, small flies :D ) but yeah, they remove anything that may sit in the paint.

Paint.


I have some but I want a big one just in case. I highly recommend Montana Black or Gold (not the colour the type) for painting out of a rattle can. Most other paints are just thin cheap rubbish.

I will also need primer.

OK, other supplies. Plotter blades.


I converted my plotter to use these blades ages ago, as a single original blade costs more than three of these. You need a new holder but once you've got that out of the way these blades are far cheaper. I also need a new soldering sponge.


OK. I am not so happy with my cable combs. They are fragile and break easy and they are clear not black. So I am ordering this set.


Which can do this.


Which is much better for me :)

I will be doing some prep later (hopefully the last) and will update as and when :)
 
Back
Top Bottom