Siliconslave's how to make espresso thread

Soldato
Joined
17 Jan 2005
Posts
8,543
Location
Liverpool
I had a bit of a mishap with my Mignon last week when it seemed to seize up completely and stop grinding. I've had it about 5 years and have never cleaned it properly before so stripped it down and gave it a good clean out all seemed well with the burrs spinning free again. However, it now won't grind fine enough for espresso. If I adjust it, the burrs start to touch but it still isn't fine enough. Has anyone else managed to align the burrs on a Mignon before? Is there a bit of a knack for it or something? I've spent hours with it now but just can't get them to adjust properly without making contact and am starting to lose my mind. :mad:
 
Man of Honour
OP
Joined
11 Dec 2002
Posts
10,807
Location
Darkest Norfolk
There's a chance they have been knocked out of wack slightly when they seized (were you adjusting without the grinder running by any chance?)

There are several guides on aligning the burrs around on the internet but essentially your using marker pens to note where the burrs are aligned then putting a thin line on the cutting surface of the static burr to see if an area is hitting first, you can then shim the opposite side(s) of the burr to try and flatten it out.

Its a bit fiddly but not too hard - this guide isn't too bad (although may not be exactly the same for your version it'll be similar): https://www.youtube.com/watch?v=Gb3PgeQ6ewY
 
Last edited:
Soldato
Joined
17 Jan 2005
Posts
8,543
Location
Liverpool
There's a chance they have been knocked out of wack slightly when they seized (were you adjusting without the grinder running by any chance?)
Nope, it was mid way through grinding a load of beans and it just seized up. I've seen that video already and have been trying the foil method, it's just so tedious and after a couple hours it still isn't shimmed properly. I guess I just need a bit more patience.. :(
 
Soldato
Joined
1 Mar 2010
Posts
21,778
when I replaced burrs on rocky I had to re-seat them once before they ran true ... no shims,
but, I think I had not sequentially/uniformly tightened the 3 screws, first time round, such that burrs were slightly off centre;
I was on the verge of sending new ones back as defective.
 
Soldato
Joined
17 Jan 2005
Posts
8,543
Location
Liverpool
Panic over. A bit more faffing around when I was less tired and frustrated and I've got it back to grinding properly. That was far more effort than I'd like to admit and it turns out I got it working without having to shim it with foil at all.
 
Soldato
Joined
14 Apr 2004
Posts
11,851
Location
UK
I was walking past a roastery whilst I was in Germany a few weeks back and decided to pick up a few bags and set up a tasting session.

w3JcXwF.png

Didn't quiet get enough time to dial in espresso but boy was it AMAZING.

giphy.gif
 
Last edited:
Soldato
Joined
25 Nov 2009
Posts
5,278
Noob here
Hi guys,
Recently delved into real coffee and bought a Sage Bambino. There's a nice indy roaster in town I've been getting fresh ground coffee from, but to get any crema I'm having to use the double walled basket suggesting it's not ground fine enough. Now I know I could just ask them to go finer... But it makes more sense I think to buy my own grinder.
So naturally I have been looking at the Sage Smart Grinder Pro, I'd just like to check this is a half decent idea though as opposed to selling the Bambino and buying a Barista Express... I talked myself out of the BE though due to the grinder supposedly letting it down a little.
 
Man of Honour
OP
Joined
11 Dec 2002
Posts
10,807
Location
Darkest Norfolk
Just ordered a Hario Switch Brewer...best all-rounder combining a steep and filter all-on-one?
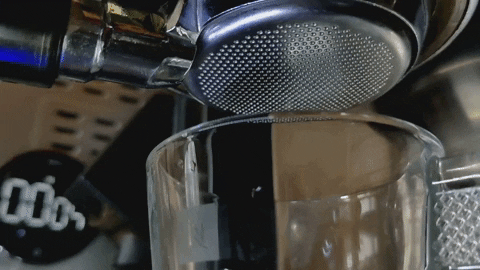
that or the clever dripper, I got given a fortnum and mason hamper with a load of coffee recently and been running it through the clever, I do like the immersion methods with a filter & the hario switch seems a good option :)

So naturally I have been looking at the Sage Smart Grinder Pro, I'd just like to check this is a half decent idea though as opposed to selling the Bambino and buying a Barista Express... I talked myself out of the BE though due to the grinder supposedly letting it down a little.
you'll get a much better grinder going separate, the smart is OK, good design from a user point of view and a good price. Might be worth looking at the Eureka Mignon Manuale, less features and a bit more, but a much better burr and less plastic overall.
 
Caporegime
Joined
20 Oct 2002
Posts
74,018
Location
Wish i was in a Ramen Shop Counter
My clever dripper broke after about a year.

I'll report back the Hario's build quality, from what I can see it has a metal thing inside, glass funnel and a rubber/plastic casing. It's quite a new thing on the market and last I check you can only import it from Japan/Korea, only bought one now because I can see it being sold on Amazon EU.
 
Caporegime
Joined
20 Oct 2002
Posts
74,018
Location
Wish i was in a Ramen Shop Counter
Got it today, photo comparing to my V60 (01). I picked up the 02 version of the Switch Brewer so it's a little larger. 03 would be huge for 1 person and probably not large enough for 2 mugs.

S4jfNVx.jpg

01 paper fits about a cm below the rim of the Switch.

yvGYHPQ.jpg

It's cool that it can also fit on the V60 jug.

wIiohUI.jpg

The Switch bit underneath. Essentially just 1 piece L-shape of plastic, going through a hole in the rubber. There is a ball bearing inside the funnel.

ACoGZ0s.jpg

3zehybY.jpg

Which means the seal is created by a stainless ball bearing and rubber. There is no rubber gasket and the total area of seal is quite a small one, the weight of the ball bearing itself is enough to create a seal.

I haven't looked too much into how to use this, i guess there are various methods but seeing I couldn't get all the way to the rim I put in 75ml first for the bloom, eject that, then seal and put in another 175ml to get 250ml total.

QI1hN5k.jpg

wT405DS.jpg

iYFvtoI.jpg

I also use the 02 papers that it came with (pack of 20), cool to see some water outside the paper. behind the glass.

f3haKsL.jpg
 
Last edited:
Back
Top Bottom