You are using an out of date browser. It may not display this or other websites correctly.
You should upgrade or use an alternative browser.
You should upgrade or use an alternative browser.
Hand made Infill plane (woodwork)
- Thread starter famas
- Start date
More options
View all postsThanks for all the comments guys I really appreciate it and it's giving me confidence to carry on and make some more.
Karl Holtey is one of if not the finest bespoke plane makers today and was one of the makers that inspired me to make my own.
While my planes may look similar to one of his stood side by the side the difference would be night and day.
While he says his planes are "hand made" he uses a lot of modern machinery to create his planes and while certainly not mass produced I believe he makes them in batches using modern machining techniques.
Some people would argue that the charm of a bespoke hand crafted tool lies in the traditional methods used while making it, Bill Carter for instance makes all of his planes in a shed in his garden only using hand tools and a small selection of bench top power tools (pillar drill, grinders, etc)
He purposely ages his planes to make them look traditional and they have a beautiful charm about them because they have blemishes.
At the other end of the scale Holtey strives for precision and his planes are as near to perfection as you could possibly get and it's only really achievable with modern machinery and techniques.
Both makers are at the pinnacle of their careers and both are well past retirement age, each makers planes are beautiful in there own way.
Holtey also makes every single part of his planes in house while on some of Caters earlier planes he commissioned Holtey to make his lever caps, though only for 4 or 5 planes I believe before carter went back to using the more traditional bridge and wedge design.
I'd say my planes are more in line with carters but I try to strive for perfection like Holtey with the tools I have available, the majority being hand.
I would still class myself as a total amateur to metal work though. Like Holtey I try to make my next plane better than the last and am improving every time.
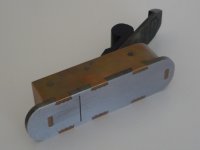
For a comparison these are some of Holtey' mitre planes.
Much more contemporary in design and made to an impeccably high standard
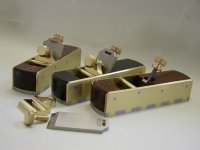
And one of Carters early "cupid bow" mitre planes. I believe Carter was one of the first current makers to add cupid bows to his dovetails.
Carter also reclaims the blades for his planes from older Sheffield planes.
While I have enjoyed every minute of making my planes and would love to make a career of it I think I have a long way to go and a lot more to learn yet.
On another note the next project has started.
I'm very lucky and been given a small amount of Rosewood so I've made a start on the marking gauge.
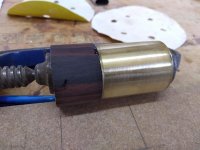
Working on the main body on the engineering lathe.
Karl Holtey is one of if not the finest bespoke plane makers today and was one of the makers that inspired me to make my own.
While my planes may look similar to one of his stood side by the side the difference would be night and day.
While he says his planes are "hand made" he uses a lot of modern machinery to create his planes and while certainly not mass produced I believe he makes them in batches using modern machining techniques.
Some people would argue that the charm of a bespoke hand crafted tool lies in the traditional methods used while making it, Bill Carter for instance makes all of his planes in a shed in his garden only using hand tools and a small selection of bench top power tools (pillar drill, grinders, etc)
He purposely ages his planes to make them look traditional and they have a beautiful charm about them because they have blemishes.
At the other end of the scale Holtey strives for precision and his planes are as near to perfection as you could possibly get and it's only really achievable with modern machinery and techniques.
Both makers are at the pinnacle of their careers and both are well past retirement age, each makers planes are beautiful in there own way.
Holtey also makes every single part of his planes in house while on some of Caters earlier planes he commissioned Holtey to make his lever caps, though only for 4 or 5 planes I believe before carter went back to using the more traditional bridge and wedge design.
I'd say my planes are more in line with carters but I try to strive for perfection like Holtey with the tools I have available, the majority being hand.
I would still class myself as a total amateur to metal work though. Like Holtey I try to make my next plane better than the last and am improving every time.
For a comparison these are some of Holtey' mitre planes.
Much more contemporary in design and made to an impeccably high standard

And one of Carters early "cupid bow" mitre planes. I believe Carter was one of the first current makers to add cupid bows to his dovetails.
Carter also reclaims the blades for his planes from older Sheffield planes.

While I have enjoyed every minute of making my planes and would love to make a career of it I think I have a long way to go and a lot more to learn yet.
On another note the next project has started.
I'm very lucky and been given a small amount of Rosewood so I've made a start on the marking gauge.

Working on the main body on the engineering lathe.

Continuing on with the marking gauge I made a start on the end brass collar for the head section.
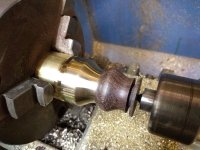
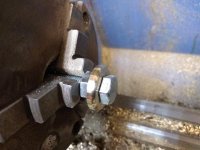
I parted off a small section of brass and then fixed it between two nuts on a bolt and secured that into the lathe.
I needed to round both sides of the brass collar.
I'm sure this isn't the ideal way of doing this but I have limited tools and it seemed to work okay.
I needed a way to secure the brass head and collar to the wood as the glue was only temporary while I machined the initial shape and not sufficient to hold the pieces together permanently.
I carefully marked hole positions on the collar and drilled the holes, I then used a bolt to align the two parts and drilled the first hole through the collar into the wood. After the first hole was drilled i inserted a spare drill bit into the hole to keep it aligned and then drilled the second hole.
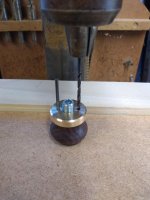
With the brass collar and Rosewood drilled I then repeated the process to drill the head of the gauge.
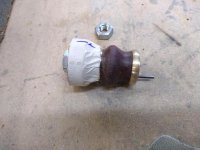
I've ordered some m3 stainless bolts that will run through the holes securing it all together, just waiting for them to arrive.
Once its all fixed together i'll mount it back on the lathe and final finish it.
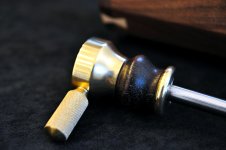
In the meantime I drilled and tapped an m8 hole into the side of the brass head.
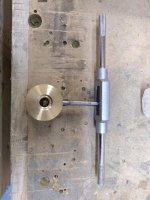
and then made the locking thumb screw.
Most of the thumb screws I've seen for marking gauges are short with a larger diameter but I wanted a longer sleeker looking one.
While doing so I found out I could knurl longer pieces of material, I always thought you needed an automatic feed on the lathe to knurl longer pieces but I hand fed this knurl and it turned out great
I still can't get my head round how this works and how manually moving the knurling tool doesn't just leave a mashed up mess but I'm pleased i can do it.
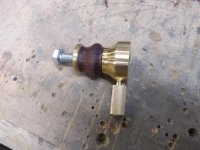
And finally machined a recess in the head for the cutter to sit into when not in use.
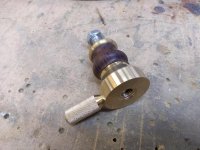
That was all for today.
Just waiting for the bolts and the steel rod to come in the post and I can make a start on the shaft of the gauge.....it's not going to be a simple shaft though.
I parted off a small section of brass and then fixed it between two nuts on a bolt and secured that into the lathe.
I needed to round both sides of the brass collar.
I'm sure this isn't the ideal way of doing this but I have limited tools and it seemed to work okay.

I needed a way to secure the brass head and collar to the wood as the glue was only temporary while I machined the initial shape and not sufficient to hold the pieces together permanently.
I carefully marked hole positions on the collar and drilled the holes, I then used a bolt to align the two parts and drilled the first hole through the collar into the wood. After the first hole was drilled i inserted a spare drill bit into the hole to keep it aligned and then drilled the second hole.

With the brass collar and Rosewood drilled I then repeated the process to drill the head of the gauge.

I've ordered some m3 stainless bolts that will run through the holes securing it all together, just waiting for them to arrive.
Once its all fixed together i'll mount it back on the lathe and final finish it.
In the meantime I drilled and tapped an m8 hole into the side of the brass head.

and then made the locking thumb screw.
Most of the thumb screws I've seen for marking gauges are short with a larger diameter but I wanted a longer sleeker looking one.
While doing so I found out I could knurl longer pieces of material, I always thought you needed an automatic feed on the lathe to knurl longer pieces but I hand fed this knurl and it turned out great
I still can't get my head round how this works and how manually moving the knurling tool doesn't just leave a mashed up mess but I'm pleased i can do it.

And finally machined a recess in the head for the cutter to sit into when not in use.

That was all for today.
Just waiting for the bolts and the steel rod to come in the post and I can make a start on the shaft of the gauge.....it's not going to be a simple shaft though.
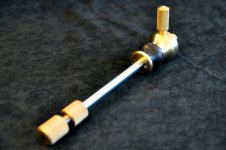
Finally got the stainless steel tube and rod in the post so I could continue with the marking gauge.
I started by threading one end of the steel tube.
Quickly realised Stainless steel is a bugger to work with, it's very hard and can't be rushed.
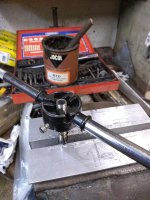
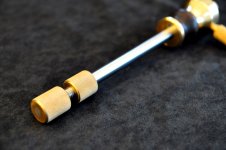
After that I started on the micro adjuster which I'm making from brass, much nicer to work with!
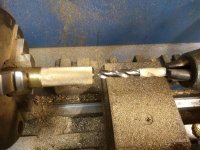
I knurl a short section and drill out the centre to thread onto the stainless tube.
Then add some chamfers and part them in two ready to work on some more later.
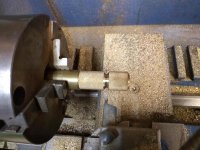
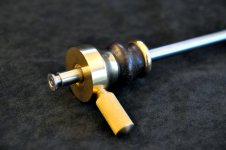
I also made a start on the cutting wheel again from stainless steel.
I bevel the rod and then square off the end to a sharp edge.
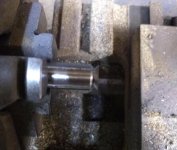
And finally drill and counter sink the head to accept a bolt before parting off completely from the rest of the rod.
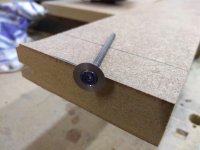
Going to try and harden the cutting wheel with my map gas torch and quench it in oil, like I do my plane blades but I'm not sure how well this with work with stainless?
I've still got to work on the inner shaft and the main head of the gauge but its getting there.
I started by threading one end of the steel tube.
Quickly realised Stainless steel is a bugger to work with, it's very hard and can't be rushed.

After that I started on the micro adjuster which I'm making from brass, much nicer to work with!

I knurl a short section and drill out the centre to thread onto the stainless tube.
Then add some chamfers and part them in two ready to work on some more later.

I also made a start on the cutting wheel again from stainless steel.
I bevel the rod and then square off the end to a sharp edge.

And finally drill and counter sink the head to accept a bolt before parting off completely from the rest of the rod.

Going to try and harden the cutting wheel with my map gas torch and quench it in oil, like I do my plane blades but I'm not sure how well this with work with stainless?
I've still got to work on the inner shaft and the main head of the gauge but its getting there.
Last edited:
Cheers for the info Mark.
Not entirely sure what type of stainless it is.
I did have a quick look into it and it seems a lot of the knife makers cool stainless between aluminium plates and don't oil quench it.
I do have a couple of bits of aluminium plate that I could try but its such a small part it might be tricky.
Hopefully it's not too critical to get it to a perfect hardness and if it fails miserably I can make another.
Slowly working my way through the marking gauge build, it's almost done and I've turned my attention to a box for it.
Totally over the top for a marking gauge but I'm keeping a theme going
Using some American black walnut I Put a 15 degree bevel on some strips then glued it together to make a dodecagon.
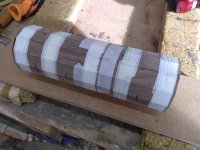
Masking tape makes for an excellent clamp to hold it all together while the glue sets.
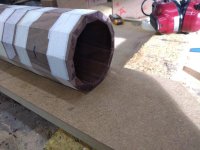
I glued all but 4 edges so I didn't have to split the box afterwards. I also added some ends to the box which I'm thinking of reinforcing later with some brass fixings, though not totally decided yet.
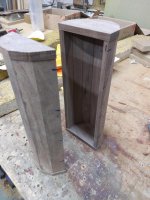
Next I made some liners for the box out of some lovely birds eye maple veneer.
Using some make shift weights to hold it in position while the glue dries.
And a test fit held in place with some quick cramps to see how it will work.
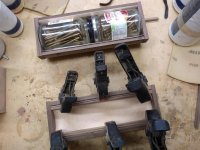
Once the glue has dried it holds the shape well, Next I'll fit it into the box using some bead to hold it in place.
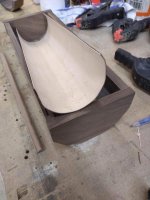
That's it so far.
I've got to work out a base for it to sit on and a latch to keep it closed but I've got a few ideas on that.
Totally over the top for a marking gauge but I'm keeping a theme going

Using some American black walnut I Put a 15 degree bevel on some strips then glued it together to make a dodecagon.

Masking tape makes for an excellent clamp to hold it all together while the glue sets.

I glued all but 4 edges so I didn't have to split the box afterwards. I also added some ends to the box which I'm thinking of reinforcing later with some brass fixings, though not totally decided yet.

Next I made some liners for the box out of some lovely birds eye maple veneer.
Using some make shift weights to hold it in position while the glue dries.
And a test fit held in place with some quick cramps to see how it will work.

Once the glue has dried it holds the shape well, Next I'll fit it into the box using some bead to hold it in place.

That's it so far.
I've got to work out a base for it to sit on and a latch to keep it closed but I've got a few ideas on that.
Slowly progressing with box.
I made some inlay for the ends of the birds eye liners. I wrapped it around a circle of MDF so it holds the same diameter as the liner.
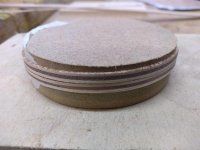
I've also made the brass clasps that the marking gauge will sit on inside the box.
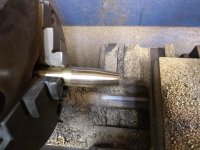
Started with some brass round bar that I tapered at both ends.
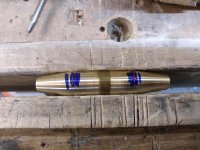
Then drilled through to make the half rounds that will hold the marking gauge.
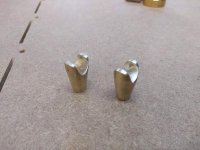
After some more shaping with hand files they are nearly finished.
Lastly I drilled and taped the bottoms to accept a bolt and polished them up.
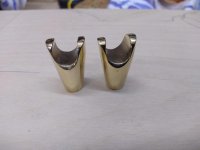
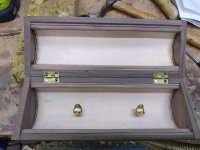
Here they are test fitted to the inside of the box. I still have a lot of work to do sanding and cleaning up the box.
Finally I made a start on adding some decorative dovetail bows to the out side of the box, they will also aid in securing the ends of the box in place.
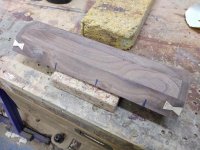
That's it for now.
I made some inlay for the ends of the birds eye liners. I wrapped it around a circle of MDF so it holds the same diameter as the liner.

I've also made the brass clasps that the marking gauge will sit on inside the box.
Started with some brass round bar that I tapered at both ends.

Then drilled through to make the half rounds that will hold the marking gauge.

After some more shaping with hand files they are nearly finished.

Lastly I drilled and taped the bottoms to accept a bolt and polished them up.

Here they are test fitted to the inside of the box. I still have a lot of work to do sanding and cleaning up the box.

Finally I made a start on adding some decorative dovetail bows to the out side of the box, they will also aid in securing the ends of the box in place.

That's it for now.
Finally got the box finished tonight, I think in the end the box took longer to make than the marking gauge.
Spent the past couple of days polishing and waxing it.
I've got a few more bits to tidy up and I've got to strip the marking gauge down to degrease it all then I'll take some photos of the entire piece which I'm hoping to do over the weekend.
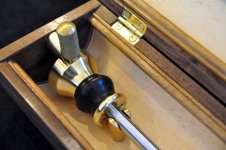
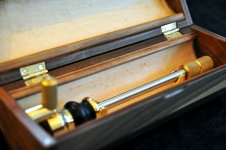
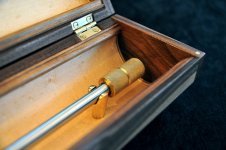
Here's a quick snap I took on my phone.
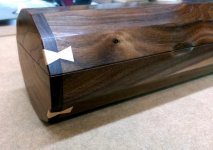
I've also been working on a short video of the build process. I didn't have time to go into as much detail with this project so it jumps about a bit but hopefully I'll get that finished with the photos.
Spent the past couple of days polishing and waxing it.
I've got a few more bits to tidy up and I've got to strip the marking gauge down to degrease it all then I'll take some photos of the entire piece which I'm hoping to do over the weekend.
Here's a quick snap I took on my phone.

I've also been working on a short video of the build process. I didn't have time to go into as much detail with this project so it jumps about a bit but hopefully I'll get that finished with the photos.
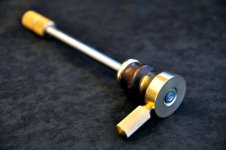
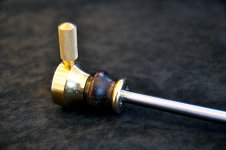
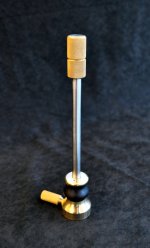
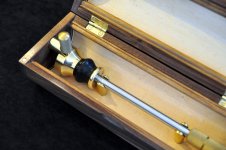
The marking gauge and box and finally done. I've really enjoyed making this piece though it took a little longer than expected.
Managed to get the photo's done yesterday.
The box is made from American black walnut, Maple and Birds eye maple.
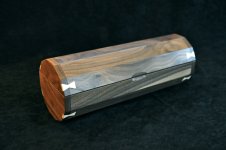
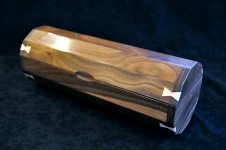
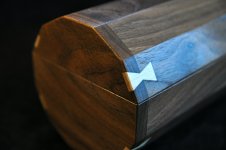
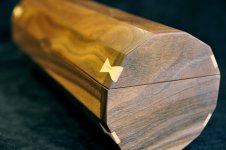
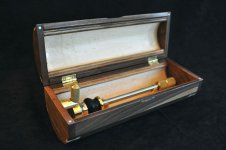
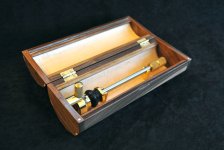
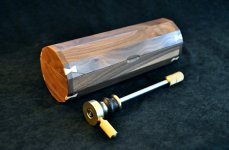
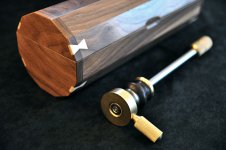
Here you can see some of the lovely figuring on the birds eye maple.
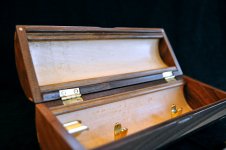
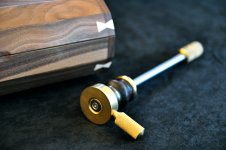
Managed to get the photo's done yesterday.
The box is made from American black walnut, Maple and Birds eye maple.


Here you can see some of the lovely figuring on the birds eye maple.


I've also been working on a video over the weeks which I finished today.
Thanks for all the support over the last month or so on this project, it's really good to hear your feedback.
I think I'll start on another plane next. I want to try and make something totally original rather than recreating older designs but I'll see how it goes.
Cheers.
Thanks for all the support over the last month or so on this project, it's really good to hear your feedback.
I think I'll start on another plane next. I want to try and make something totally original rather than recreating older designs but I'll see how it goes.
Cheers.
Cheers @Mark A 
To be honest I'm not sure if the heat treating made much of a difference, I actually made another scribe wheel and didn't heat treat it and it seems much the same hardness.
I've since found a 12mm carbide round insert cutter which would work well and last ages but the stainless one seems to be holding a decent edge so far and is easy to sharpen when it does get dull.
Thanks again for your comment.
Thanks for your comment @Noakesy85
I'd love to have the space to turn my garage into a work shop.
Keep an eye out for older well looked after hand tools at car boot sales, you can get some bargains.
Generally stay away from the cheaper mass produced planes, they take a lot of fettling to get set up nicely.
I'd love to have the space to turn my garage into a work shop.
Keep an eye out for older well looked after hand tools at car boot sales, you can get some bargains.
Generally stay away from the cheaper mass produced planes, they take a lot of fettling to get set up nicely.
Thank you for the comment @Cosmic182
No planes for sale at the moment though I may make one to sell in the future, ideally I'd like to get my own design nailed down then make one and see what people think.
I was going to start making another plane but I'm currently working on something else that I plan to make two of, if they both turn out well I will try to sell one of them.
Won't bother saying what it is at the moment in case I fail miserably

Last edited:
Hello again all.
It's been a long while since I've made a post, I think it's fair to say its been an "interesting" year for most if not all of us.
To catch you up I was made redundant in February from a family run business where I had worked for nearly 18 years, it was a devastating blow not only for me but for every one that worked there.
Very fortunately I found work and I've settled into my new role though I am missing the variety that my old job offered, I don' think I can call myself a furniture maker anymore, I get looks of disdain if I pull my shooting board out rather than use the chop saw and don't mention my yankee screwdrivers (I jest)
My partner has also been affected by the pandemic and a few mouths after me was also made redundant. Again very fortunately she has managed to find work which is a huge relief.
I hope every one is doing okay and I hope this settles down soon so we can all return to some form of normality.
The passion to make tools is still burning within and I had started a new project only weeks before I was made redundant which had obviously been put on hold.
Thankfully I have had the opportunity and drive to start the project up again and thought I would share it with you.
Around the middle of last year I discovered Skelton saws and after hours of searching I was blown away by the ingenuity, quality and design of Shanes saws. I've not had the pleasure of seeing one of his saws first hand but I must have watched every video and seen nearly every photo. His work really is exceptional.
In particular I loved the look of his gents saw. A bit rich for my pockets but it sparked a desire to try and make my own, so late last year around October/November I started to make a pair of saws based on his but with my own interpretation. I planned one to be rip cut and the other to be cross cut.
I started with a piece of 300x50x9mm brass which I cut in half. This will form the backs of the saws
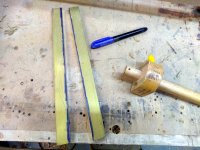
Next I had to form the slot for the blade to fit into. Ideally this would be done with a slitting saw on a milling machine but I had neither of those tools.
So next best thing was a set of cheap slitting saws for a Dremel which I used in a pillar drill with a backing fence.
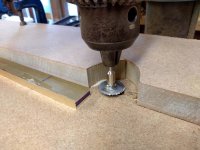
The saws where "about" the same thickness as the saw plate I intended to use. I say "about" because no matter how well you set the pillar drill up it will inevitably make a "wobble" cut when forcing it laterally. More on this later.
After a quick test cut I realised I would need some hold downs to preform the cut
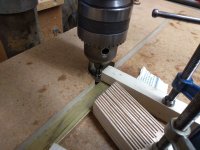
Taking it very slowly and in several passes I got the slit cut, certainly not the best way of doing it but I had to used what I had available and fortunately it came out ok.
With the slit done I could start to taper the backs and add the cove detail.
Tapering was simply done with hand files and the cove detail I did on the over head router which I didn't take any pictures of as I really don't advocate this way of doing it for safety reasons mostly but again I used what I had. (really would like to get my hands on a milling machine)
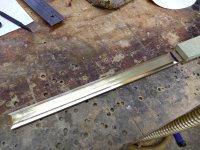
After a bit of sanding to clean up the machine marks the backs where at a stage that I could start to work on the handles of the saws.
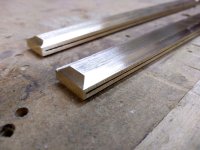
It was a good few days work to this point as like normal I was just doing it in my breaks.
Next up the handles.
It's been a long while since I've made a post, I think it's fair to say its been an "interesting" year for most if not all of us.
To catch you up I was made redundant in February from a family run business where I had worked for nearly 18 years, it was a devastating blow not only for me but for every one that worked there.
Very fortunately I found work and I've settled into my new role though I am missing the variety that my old job offered, I don' think I can call myself a furniture maker anymore, I get looks of disdain if I pull my shooting board out rather than use the chop saw and don't mention my yankee screwdrivers
 (I jest)
My partner has also been affected by the pandemic and a few mouths after me was also made redundant. Again very fortunately she has managed to find work which is a huge relief.
I hope every one is doing okay and I hope this settles down soon so we can all return to some form of normality.
The passion to make tools is still burning within and I had started a new project only weeks before I was made redundant which had obviously been put on hold.
Thankfully I have had the opportunity and drive to start the project up again and thought I would share it with you.
Around the middle of last year I discovered Skelton saws and after hours of searching I was blown away by the ingenuity, quality and design of Shanes saws. I've not had the pleasure of seeing one of his saws first hand but I must have watched every video and seen nearly every photo. His work really is exceptional.
In particular I loved the look of his gents saw. A bit rich for my pockets but it sparked a desire to try and make my own, so late last year around October/November I started to make a pair of saws based on his but with my own interpretation. I planned one to be rip cut and the other to be cross cut.
I started with a piece of 300x50x9mm brass which I cut in half. This will form the backs of the saws

Next I had to form the slot for the blade to fit into. Ideally this would be done with a slitting saw on a milling machine but I had neither of those tools.
So next best thing was a set of cheap slitting saws for a Dremel which I used in a pillar drill with a backing fence.

The saws where "about" the same thickness as the saw plate I intended to use. I say "about" because no matter how well you set the pillar drill up it will inevitably make a "wobble" cut when forcing it laterally. More on this later.
After a quick test cut I realised I would need some hold downs to preform the cut

Taking it very slowly and in several passes I got the slit cut, certainly not the best way of doing it but I had to used what I had available and fortunately it came out ok.
With the slit done I could start to taper the backs and add the cove detail.
Tapering was simply done with hand files and the cove detail I did on the over head router which I didn't take any pictures of as I really don't advocate this way of doing it for safety reasons mostly but again I used what I had. (really would like to get my hands on a milling machine)

After a bit of sanding to clean up the machine marks the backs where at a stage that I could start to work on the handles of the saws.

It was a good few days work to this point as like normal I was just doing it in my breaks.
Next up the handles.
With the saw backs partially done I moved onto the handles.
The handles wont follow any traditional form, I had a vision in my mind as to how I wanted them to look and I've tried to stick closely to it.
I chose to use maple and cherry for one handle and ash and wenge for the other, I had these woods available to me at the time but I'm still waiting to get my hands on something really exotic.
I love maple and this piece had a small amount of "pip" which was complemented nicely by the cherry.
The dark and light contrast of ash and wenge goes together nicely too and they have a similar open grain structure.
I used them as I was toying with the idea of using a liming paste to further contrast the open grain but after a quick sample I preferred the natural colour and contrast of the woods.
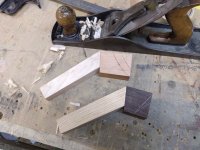
The woods are simply held together by beech dowels and glue, cramped up and left to cure over night.
After some early shaping and adding a 45 bevel to the handles I made a simple jig for cutting the slot in the upper portion of the handle to accept the brass backs.
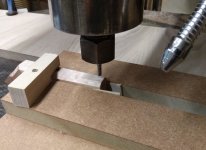
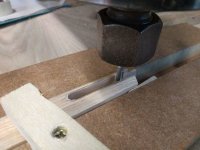
Using the over head router, taking shallow passes to reduce chatter I cut the majority of the wood away
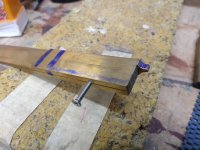
And then a lot of trial fitting and refinement with hand chisels. I used blue marker pen on the side of the brass backs when pushing them into position in the handle, this then left a mark of any tight spots in the groove which I could then cut away with the chisel.
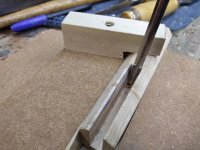
This is one of the grooves nearly finished, Rather than coming to abrupt square end I'm attempting to add a detail feature to finish it off
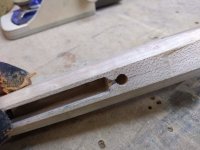
And here is the early stages of transferring that detail over to the brass back. I plan to use a piece of round stock in the hole getting the joint as tight fitting as possible to hopefully leave a near seamless joint.
This will require a lot of careful filing and gouge work.
I also drilled and taped for a bolt in the under side of the brass back. This will be fixed through the bottom of the handle when I come to assemble the saw.
The handles wont follow any traditional form, I had a vision in my mind as to how I wanted them to look and I've tried to stick closely to it.
I chose to use maple and cherry for one handle and ash and wenge for the other, I had these woods available to me at the time but I'm still waiting to get my hands on something really exotic.
I love maple and this piece had a small amount of "pip" which was complemented nicely by the cherry.
The dark and light contrast of ash and wenge goes together nicely too and they have a similar open grain structure.
I used them as I was toying with the idea of using a liming paste to further contrast the open grain but after a quick sample I preferred the natural colour and contrast of the woods.

The woods are simply held together by beech dowels and glue, cramped up and left to cure over night.
After some early shaping and adding a 45 bevel to the handles I made a simple jig for cutting the slot in the upper portion of the handle to accept the brass backs.

Using the over head router, taking shallow passes to reduce chatter I cut the majority of the wood away

And then a lot of trial fitting and refinement with hand chisels. I used blue marker pen on the side of the brass backs when pushing them into position in the handle, this then left a mark of any tight spots in the groove which I could then cut away with the chisel.

This is one of the grooves nearly finished, Rather than coming to abrupt square end I'm attempting to add a detail feature to finish it off

And here is the early stages of transferring that detail over to the brass back. I plan to use a piece of round stock in the hole getting the joint as tight fitting as possible to hopefully leave a near seamless joint.
This will require a lot of careful filing and gouge work.
I also drilled and taped for a bolt in the under side of the brass back. This will be fixed through the bottom of the handle when I come to assemble the saw.


