JayGee's Lian Li PC-V3000WX Dual Loop Build

Associate
Joined
3 Jan 2018
Posts
205
Location
Cambridge
This build is now a wrap - a few final pictures start here -> https://www.overclockers.co.uk/forums/posts/34380435/

Thanks for joining me on the ride.

JayGee

--------------------------------------
++++++ Original log starts here +++++
--------------------------------------

The excitement and buzz of new generations of GPUs and CPUs has got me looking to launch a new build. This one is almost certainly going to be a slow burner though, to some extent due to the challenges of supply and demand (I've got an RTX3090 on order, but I've no idea when it shall arrive) but also because there is no particular hurry as I'm in the fortunate situation where I don't need to tear down an existing rig in order to build a new one.

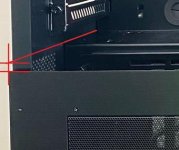
Besides the RTX3090 the only other element of the build that is firmed up is the case - a Lian Li V3000WX - which I selected because of its capacity for water cooling, most notably due to the "basement" section allowing for good airflow and thermal separation for the placement of a 480 rad.

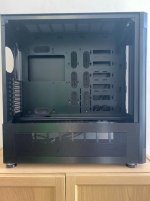
Prior to ordering the V3000 I'd compared the dimensions to those of my bequiet DBP900 to make an assessment of how it would fit on my desk and just how much space it would fill. On paper it didn't seem like a significant change of scale[1], but now that I have it with me, I have to say that it really has a significant presence to it!

The rest of the components I'll figure out as a I go but my initial thoughts are:
  • CPU - waiting on the announcement from AMD on their new Zen3 CPUs - I've not used AMD before but they've caught my attention with all the hype/leaks around the Zen3.
  • All of my builds to date have used Asus Mobos so I'll likely to stick with them again for the familarity I have with their BIOS.
  • Given the space of the case I'm looking at going with a dual loop setup - which shall be a first for me.
  • Provisionally I'm looking at a 480 in the basement for the GPU loop and another 480 up top for the CPU, with Noctua NF-F12 PWM chromax fans on both.
  • Aqua Computer for control - see https://www.overclockers.co.uk/forums/posts/34020363 for more details on that.
  • For water blocks I'd like to use Heat Killer but they don't currently have any plans for RTX3090 blocks so I suspect that I might use EK blocks.
  • For hardline tubes and fittings I've previously only used Monsoon with the acrylic welded collars but getting hold of that kit has been increasingly difficult over the years so I'll likely look for a different solution this time around. I'm currently finding my head turned by the chrome effect brass tubing offered by Bits Power - it looks awesome but I wonder how much I'd miss by not having sight on the fluid in the loop for the peace of mind that it brings.
  • NVME M.2 for the OS; SSDs for games/programs; SSHD for storage.
  • ...
With regards the overall aesthetic the only thing that I can say with some certainty is that this isn't going to be an RGB-rainbow-puke build. :D

[1] Comparision of dimensions (in mm)
Lian Li V3000WX 245(W) x 625(H) x 605(D)
bequiet DBP900 243(W) x 586(H) x 577(D)
 
Last edited:
A few small updates to make on component selection and ideas/inspiration.
  1. Having taken a look at the case and made a few measurements I now think that I'm better off going with a 420 (~40mm thick) in the top as the top cover vent holes are setout for a 420 and not a 480.
  2. For the basement rad I'm going to go with 60mm thick 480.
  3. Accordingly I've now ordered the following fans:
    • 4 x Noctua NF-F12 PWM Chromax (for the 480 rad)
    • 3 x Noctua NF-A14 PWM Chromax (for the 420 rad)
    • 4 x Noctua NF-S12A PWM Chromax (case fans - three at the front, one at the rear)
  4. Other components that are now on order:
    • 1 x Samsung970 PRO 512GB NVME M.2 (for the OS / C: drive)
    • 4 x Phanteks Halos LUX RGB Fan Frame (for the basement fans)
    • 1 x Phanteks RGB Digital Controller Hub (which I hope to use for both the Halos and the V3000WX front panel)
    • 2 x 4-port PCI-E to USB 3.0 cards (I have a lot of USB peripherals, including a Rift, HOTAS, Peddles, etc.)
On the ideas/inspiration front I very much like the "light floor" that @mithiral67 included in his V3000 Greenhorn Dragon AKA My Overkill Build and I'd like to include something very similar in my own build.
 
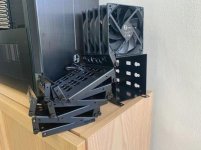
Although I can't do much building right now, I can strip out the four 120mm Lian Li stock fans and the drive cages, none of which are required...
lXpPhjG.jpg xwQDFWv.jpg

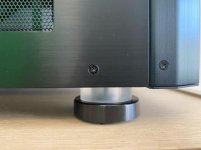
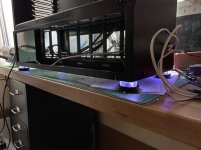
You might notice that each of the feet have an acrylic spacer...
0BWLm5a.jpg

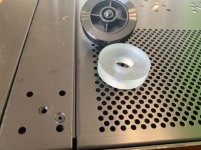
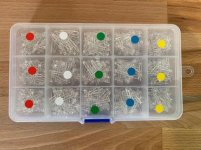
One common mod to these cases that I've seen exploits this feature by the addition of LEDs, and, on removal of one foot I can see that that might not even involve drilling out any holes in the case because, very conveniently, each foot placement has four holes around it that are the perfect size to accept 3mm discrete LEDs. And, I just happen to have a box of those...
4ck9t3Y.jpg ryYmOnO.jpg
So all that I really need to do is drill holes to match in the acrylic spacers and wire up some LEDs to fit.
 
Last edited:
One challenge to overcome is that I want to separate the basement from the main section of the case which I plan to do using an acrylic "light floor" (see the start of this log for credits/links for that) but there's a shift in levels between the existing floor in the rear half of the case and the top of the basement side cover (i.e. the piece with the fan cover in it) of a few (5-ish?) millimeters. When I take into account the likely thickness of the floor that I need to fabricate the difference in height is going to be quite noticeable if I take it out level...
LxuoEfb.jpg

I'm going to hold off on determining how I handle that until I've figured out the tubing runs and what space I have to work with once I have more of the case populated but I suspect solving this is going to require that I make up a jig to form the acrylic over with a heat gun - something that I've not done before.
 
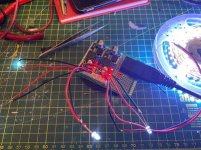
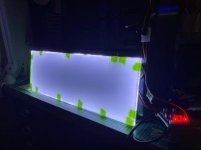
I broke the soldering iron out last night and knocked up a board to power some of the lighting. In summary it takes the 12V and 5V supply from a MOLEX connector and allows each one to be regulated so as to adjust the brightness of the LEDs that are plugged into it. The plan is that the four individual LEDs shall light up the feet of the case and the LED strip shall light up the "light floor". Please note that the bare wires/connections that you can see in the picture are temporary, simply for the purpose of testing.
ItKM9GQ.jpg
 
Last edited:
Nice, i like this little mod! Looks good!
Yeah, I'd like to say it's an original idea, but it isn't - I saw this done on exactly the same case (if I can find the original source I'll add it in later) and decided to incorporate it in to my own build as it's both simple and effective.

Edit/update: the inspiration/source for this mod is at about 6:08 in this build video -> https://www.youtube.com/watch?v=VVcJJlOtR2s&t=240s
 
Last edited:
Should look good provided it's properly bent (or pre-bent) and isn't going to discolour with coolant exposure like some soft tubing can or with age as long as it's been properly sealed by the manufacturer. I've seen some wax or oil the metal to stop it oxidising previously. The only thing I wouldn't use it for is for connections to the pump. You may find that it transmits the vibration too much and a short link of soft tube (if out of sight) may help. If there are o-rings in the connectors that may be enough though - give it a try and see if it's a problem. Silence is a key factor for me...if you couldn't tell.
As for sight of the coolant, you'd get evidence of flow from the flow meters you're putting in and you can always set an alarm on the Aquaero to go off if the flow rate drops to a set point. If you res is clear, that'll still give you sight of the coolant so you know it's not empty. There are reservoirs with fill-level sensors too. They can be a little temperamental but they do at least alert you if something breaks and you're currently cooling your carpet instead of your GPU. There are also flow spinners if you want something decorative in the loop that shows flow. I'd stick a pressure relief membrane on the top of the res if you're going to use one of those - maybe I'm just paranoid but that's the component that on me cracked several times due to pressure as the temp rose.
Fancy seeing you here. :)

I'm currently flip flopping in my mind between chromed-brass tubes by BitsPower and the borosilicate ones by Mayhems. I see pros and cons for each but I think either would look the part.

You're right with regards the use of flow meters, level sensors etc for giving confidence that liquid is moving through the system as expected and not "cooling the carpet", but that's not really my main concern. What I was really eluding to was the detection of "micro-leaks" which I've picked up in the past by spotting small pockets of air appearing in high points in tube bends - early warning of a problem before, I suspect, instrumentation would pick it up. Although this is seated in real experience I'm most probably being a little bit more paranoid than I need to be - especially so on the basis that I plan to have a good deal of the loop behind the scenes and out of sight regardless of the choice of material so the emphasis should really be on ensuring the install is properly pressure tested as opposed to anything else at this stage.

And to your point about decoupling vibration from the pump - my current thinking is that both the inlet and outlet of the pumps shall be out of sight and therefore it's likely that I'll use soft tube for those runs anyway.
 
If I go with either glass or metal then I'd most likely make use of the fact that you can get pre-bent. As much as I think I'd enjoy the challenge of bending these tubes I'm also very aware of how much goes to waste when I bend acrylic so given the price differential versus acrylic I'm more inclined to go with pre-bent for these materials.
 
Yes, it is a little darker in the centre. I've not yet tested it but my instinct is that with the space available I won't be able to get enough distance behind the acrylic with under lighting to avoid obvious pin pointing but it's certainly worth checking that out to see if I can achieve a more even glow.
 
I've just ordered some Plexi that is specifically manufactured for this kind of application, I'll see how that works out before I look at alternatives such as these COB strips (I'd not heard of those before, so thanks for the heads up).
 
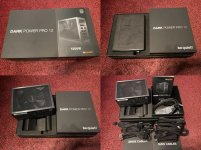
Things continue to tick along quite slowly on this build but this morning the PSU that I selected has arrived - the 1200W Dark Power Pro 12 from be quiet. I appreciate that 1200W is somewhat overkill for the build but it's the smallest unit that they make in this range and it ticks so many other boxes for me (not least of all being that I was able to get hold of one!), including the fact that it comes with a full and extensive set of cables that are all individually sleeved. As of right now I'm still undecided as to whether I keep all the cable sets as they are (all black) or whether I add some accents by resleeving one or two individual cables. Either way I won't have the expenses of buying custom cables or the massive time sink of building my own custom cables (which is satisfying but, having done it once, daunting)...

QfZKggY.jpg
 
Last edited:
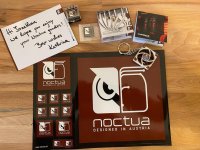
A bit off topic but.... some nice goodies have just arrived from Noctua after I contacted them to see if I could get hold of one of their metal case badges:
X3SaWPG.jpg
 
Well I'm now settled on a few more parts, with orders placed...
  • GPU: Asus ROG RTX3090 Strix OC - ETA 20/Nov
  • GPU Block: Alphacool Eisblock Aurora Acryl GPX-N RTX 3090/3080 ROG Strix with Backplate - ETA TBC
  • RAM Block (to fit to backplate): Alphacool D-RAM Cooler X6 Universal - Acryl Black Nickel - ETA TBC
  • CPU: Ryzen 5950X - ETA 30/Nov
  • CPU Block: Aquacomputer cuplex kryos NEXT with VISION AM4, nickel/nickel - ETA TBC
I'm also interested to pick up the Asus ROG Crosshair VIII Dark Hero but haven't figured out the release date on that just yet - I assume it should probably be available in a time frame that shall fit with the 3090 and/or 5950 arriving.
 
You did well. I wasn't expecting such a rush on Ryzen's - naive, perhaps. Site went kersplat under the pressure. Just got a pre-order in but at these rates and 40 mins after launch I reckon the queue for the 6900 will start before I get to the front of the queue. Good job I've not got absolutely everything built and just waiting to drop in a CPU! :rolleyes:
Yeah, I'd heard different things with respect to when the Zen3's would be available for sale (OCUK had said 5pm others had said 2pm), so I was hitting F5 on various sites from just before 2pm. :)
 
A few more parts are now on order...
Edit (to save a double post for a minor update), and also...
  • Mayhems X1 clear coolant
 
Last edited:
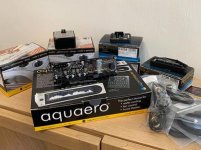
Test fit of the various Aquacomputer components all mounted to a 3mm aluminium plate which is in turn then mounted using M3 screws to four existing threaded holes in the case:
wGZKV7Y.jpg

The Aquacomputer components are:
  • 1x Aquaero 6 as the central hub and to take care of case fans, ambient temp monitoring, etc
  • 2x Quadro - one for CPU loop monitoring and fan/pump control; one for GPU loop monitoring and fan/pump control
  • 1x Farbwerk 360 - ARGB control
  • 1x Splitty9 - internal USB hub
  • 1x Hubby7 - Aquabus hub
BTW the observant might notice that I've got the Farbwerk board connected to the Aquabus despite the fact that this presently doesn't serve any real purpose. I hadn't realised that at the time that I connected things up but, for now at least, I've elected to leave it connected on the off chance that a future firmware update might bring this into play.
 
Back
Top Bottom