JayGee's Lian Li PC-V3000WX Dual Loop Build

Nice. Very tidy. What died that the ali plate got upcycled? I've got chunks of an old Coolermaster case used that way.
The Quadros look like they don't have mounting holes - unless they're only visible on the back. Did you just stick all/some of it down with double-sided pads or have you drilled and tapped the plate for standoffs? Mine went directly into the bottom of my case and the female-female standoffs were screwed in from underneath. Worked fine but would have been easier to do it on a plate to work outside the case - also means you can modify it (creating metal chips) without taking (or risking!) everything out of the case.
Thank you.
The plate was new, cut to size and holes tapped for the M3 mounting screws.
All the boards, including the Quadros, have mounting holes, but they're under the front plate so they're not visible.
 
Last edited:
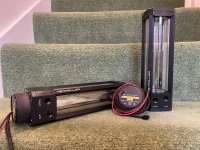
It's shaping up to be a big day as far as incoming parts are concerned with notifications for the delivery today of the GPU, tubing, reservoirs and pumps. I'm a grown man, I really shouldn't be this excited.
 
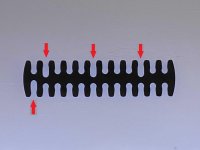
One aspect of be quiet's Dark Power Pro 12 PSU that appealed to me was that the included cables were all individually sleeved and came with cable combs. What I hadn't appreciated, until just now, was that the included cable combs have been very neatly tailored to how the 24 pin plug is wired up, i.e. the combs make allowance for the fact that four of the pins each have two cables crimped to them by having additional space for those specific runs...
gTgZ4kO.jpg
 
Really like these, was a toss up between these and Aqualis on my last build, went with the latter and waterfall effect.
Yeah, they look gorgeous and the sheer heft of them just oozes quality. I also like that the way the pump attaches to the res you're able to orientate the pump such that you can position the cables in the most convient place to hide them (which is kind of necessary given that the power feed is not sleeved).
 
Surely you mean "given that the power feed is not sleeved.....yet", right?! :D
In my last build I sleeved the pump cables because placement meant they would otherwise have been an eye sore; but with this build I'll have the ability to feed the cables straight through the back panel and with their placement I'm 99% confident that they'll be out of sight so sleeving won't be a necessity.
 
Today is a good day.
This morning I received notification that the Dark Hero that I had on pre-order is shipping.
This afternoon I received notification that the 5950x that I had on pre-order is shipping.
Today is a very good day indeed.
 
Ah, good choice! :D Sorry to try and drag you down with me - but forewarned....as they say!
Not a problem. I don't know about you but one of the appeals of building is the problem solving along the way. Starting out with an idea of what you want to achieve and then working through how you accomplish that.

A very small, very silly example, from this afternoon, to illustrate that. I dug out the three Noctua fans I want to use for intake at the front of the case for a test fit to see how the cables would route. To have them in the right orientation, i.e. pulling air into the case, the labels on the fans will be visible on the inside of the case (even when spinning because they're on the frame). If I orientate them so the label is the right side up it means the fan cables are on the outside edge where they'd potentially be more obvious; but if I flip the fans to get the cables to the inside edge, out of sight, then I'd have the labels upside-down. Obviously(!) neither is ideal, but it should be clear that having upside-down labels would be a direct afront to any sane person's sensibilities. So, with the orientation decided it was then simply a matter of figuring out how to route the cables between the fans to take them to the other side out of sight. That in turn reduced the length of cable available and therefore limited further options on routing. All of which culminated in figuring out that I need to drill out a pass through in the case. For me that is all part of the fun. Pull together a bunch of kit from a multitude of different manufacturers and suppliers and get it working together both in form and function.
 
I think it depends on your intentions when you start out. If it's a project you expect to be long and involved and partly done for the purpose of making something challenging, yes absolutely. When it's something "simple" you're just trying to get done, the endless layers of fixing one problem to be able to fix another to be able to even start addressing the issue that stopped you making progress in the first place can be..... frustrating. Lately everything seems to fall into the latter category and the sanity required is a limited resource!
Yeah, that's fair - and it was pretty much my approach with my home server build, it's entirely utilitarian and sits mostly out of sight - a quick build and the issues I encountered with that were frustrations more than fun distractions.

Another option for fan stickers upside down is to replace them. Some, I think, have managed to wet them, lift them and reapply (you'd have to check how) but otherwise you can either stick a round black (adjust colour as appropriate) sticker over the top or something with a logo. These days you can probably get some custom printed and cut for you. You certainly can with PCBs as long as you don't mind waiting for them to ship from China.
I hadn't considered either of those approaches, but they certainly could have been options. Removing them and rotating them feels like it would have been more faff with a fair chance of leaving things not quite perfect enough though. I'm not quite sure how I feel with covering up the Noctua stickers with something else or nothing - I see pros and cons (with the biggest con that it would force me to be creative (if I went with an alternative design)). :)

Can you solder and/or crimp? If so, you could probably make custom length sleeves extensions and/or Y splitters as an alternative solution....not there's anything wrong with drilling a pass-through.
Absolutely, and I will almost certainly be breaking out both my soldering iron (again) and crimpers before this project is done.
 
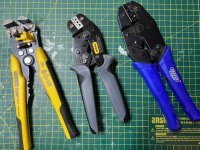
Damn you and the temptations you put in front of me, I just had to walk over to the workshop to remind myself what I had in the way of wire strippers (beyond my trusty pen knife) and crimpers, it's not exactly an extensive array but they've served me well enough when called upon...
Bh1f7ud.jpg

And just for completeness, whilst we talk tool p0rn, here's my soldering iron...
cOKPJbB.jpg
 
Last edited:
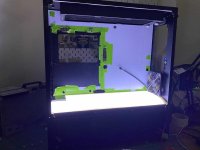
One of the hardest pieces of this build to date has been fabricating the "light floor" that separates the basement from the main section of the case. The two main components of that challenge have been to achieve uniform lighting and bend the three layers of acrylic to fit neatly together and fit within the constraints of the case. On my third attempt I've now achieved something that I'm rather pleased with...
p6VY76z.jpg

Some additional notes on how I achieved this and what I learnt along the way:
  • The final implementation is made up of three layers, a sandwich if you will.
    • The bottom layer is 3mm mirror acrylic (to reflect as much light as possible upwards), this is cut to fit snugly within the case.
    • The middle layer is 4mm clear acrylic. The uppermost surface was sanded with 80 grit sandpaper across it's entire surface, and after rounding off the corners the edges were polished. This piece was cut with ~5mm gap all the way round relative to the two other pieces. The edges are wrapped with a 4mm wide LED strip (120 LEDs per meter) which is held in place by a few layers of white insulation tape to reduce the "spotting" of the LEDs around the edges, this was trimmed back to create a uniform edge.
    • The top layer is 3mm opal white acrylic and, like the mirror acrylic it is cut to fit snugly within the case.
  • In this implementation I've not attempted to bond any of the pieces together as my previous attempts to do so were problematic, e.g.:
    • Bonding before bending made it difficult to bend due to the amount of material to heat up, resulting in obvious deformation of the layer closest to the heating element.
    • Bonding after bending was challenging because anything less than perfect bends on all pieces meant that the acrylic welding liquid can't be applied uniformally which resulted in "shadows" being visible at the surface.
    • With the insulation tape used to wrap the LED strip it rules out the possibility to make a bond at the edges.
  • Some other random learnings/thoughts:
    • The mirrow base layer is marginly better than having white acrylic at the base for creating a uniform light at the surface but it also has the advantage that it has an opaque bottom to it so light doesn't spill into the basement.
    • Along the way I experimented quite a lot with sanding different surfaces, e.g. both sides of the clear acrylic, one/both sides of the white acrylic top layer. Ultimately what I found out was that I achieved the best result with this final implementation - i.e. only sanding the upper layer of the clear acrylic.
    • Keeping the three layers separate makes fitting the light floor into the case easier as individually they're easier to flex than one combind piece.
    • Keeping the three layers separate will make it easier in the event that I have to replace the LED strip at any point as bonded acrylic is effectively a permanent bond.
And finally, for now, I'm now contemplating in lining the entire main chamber in white as I like the effect that the light floor has on the rough white background that I've used to mark out cuts and holes. The original plan was to have a piece of black acrylic as the back plate and to leave the sides untouched.
- What do you reckon: all in on a white interior or stick to the original plan?
 
Last edited:
Where does the bending come in?
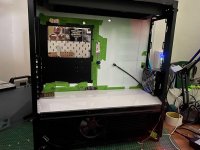
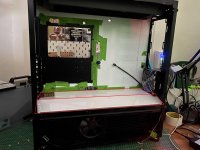
Yeah, that's difficult to see with it lit up, so here's one with the light off and another where I've added some lines to make it more obvious...
a4rJNSz.jpg
nPP9J2Y.jpg

Edit: the reason that the bend is necessary is because without it the level of the floor would be above the upper limit of the basement section.
 
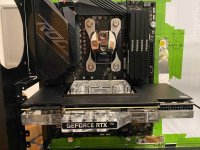
Good that you're here @Jay85 as I've just implemented an idea that I first read about in your EK Quantum Kinetic FLT Rebuild build log, which is to mount a RAM block on the backplate of my full cover GPU block on my 3090...
xkJJjqA.jpg

I'll tidy up the mounting screws with some dome head nuts, but otherwise I'm very happy with how it came together.
 
Good questions, for which the short answer is: it just seemed like a neat idea, so I gave it a go.

The slightly longer answer is that I've absolutely no first hand experience of how hot the backplate shall get without this addition (or even with it just yet) as this is a brand new build and, beyond a cursary test of the card with it's stock cooler, it's not be run up in anger yet. I guess in theory I could have plumbed it all together using soft tubing to get some base line figures before committing to this mod but once committed it's not all that practical to back out of after holes are drilled (okay, it is doable to back out but at the cost of a bit more faffing). So, I just took a leap of faith and I hope that it has at least a neutral impact, anything beyond that is all for the good.
 
Last edited:
Ah, the old "I'll put the loop together and not have to take it apart" delusion.... we've all been there! ;-D
Not exactly. It's more that I'm really aiming for a very clean look which shall be achieved, in part, with a back panel made up with holes placed where they're needed for various cables and some pass-through fittings for the loops. The inclusion of this additional block (or not) will have an impact on how I run that loop and that ripples through to where the pass-throughs on the back panel will need to be. Ergo, if I built the loop up without the extra block and then determine to add it later it would result in quite a bit of additional work and expense as it would require replacing the back panel as well as a number of tube runs.

But yeah, I get what you're saying with things that you've done in the past that you wouldn't bother with again. I've never bothered with RAM coolers, but there are certainly things that I don't think I'd do again, such as SLI (I still think it looks very cool, but it really is pointless for pretty much anything that I do).
 
Last edited:
Back
Top Bottom