May have bitten off more than I can chew...MR2 Winter project

Good luck with the project.

I've still got my 2nd GT-S, i've been driving them since 2004. I don't see many on the road these days.

If you have stock 15" wheels put 205/50/15's on the front 225/50/15's on the back. It makes it less understeery than the original 195/55/15 & 225/50/15 setup.

Don't put 205's on the rear unless you are mental ;)

I've had 17's with 215's on the front and 245's on the back since around 2005, never had a problem in any weather, even snow with 300+bhp.
 
Last edited:
Thanks for your replies,

Vanpeebles - I will be uploading more pics today :D

Spaceman - good to see another MR2 still being driven and since 2004 - they really can't be too much hard work to live with 14 years down the line! The wheels are 15" stock - I was curious about sticking to the same profile tyres front and back - I will look at some tonight when I do some of my university work - it does seem that 205s on the back can cause over-steer, which is probably not good!! I will probably get some larger staggered alloys at some point, I think 16s would look good, 17s may go well with some changes to the spring rate and ride height.

Today I managed to blow my 15 A hazard/horn fuse and my 15 A Stop light/rear light/dash lighting etc fuse :o

It started when I received my new clear lenses - which came with coloured indicator bulbs:

WA0020.jpg


The trouble is, I have two different connectors on my loom - a square one and a rectangular one. So in my infinite wisdom, I crimped them by bending out some spade connectors which weren't wide enough:

WA0022.jpg


Which was fine, until I accidentally shorted the other two terminals (oops!) when one of the wires came away.

Anyway, I eventually got it back together, re-crimped and replaced the two burned out 15 amp fuses. I am not sure why there were two different connectors on the car, but at least it is all working, bit of a bodge, but working.

Here is a before shot of the passenger side:

WA0017.jpg


And a before shot of the driver side:

WA0018.jpg


Here is an after shot of the lights all fitted and working, unfortunately, my mobile camera didn't pick up the indicators flashing:

WA0023.jpg


Here is a shot with the covers on:

WA0032.jpg


I'm not convinced that I'm putting the cowls on correctly, plus I'm missing 8 x philip head screws and 8 x 8 mm bolts.

Here are some other pictures of the car, engine showing the turbo? struts bars:

WA0031.jpg


I seem to be missing a lot of stuff from the front trunk of the car, including a wheel and cowling!! But has got some sort of strut bar on it and someone has left some cables here:

WA0030.jpg


Side view, showing the bonnet and front trunk now closed properly:

WA0025.jpg


Interior shot of the car, really needs a good valet inside and out and the steering wheel is pretty worn:

WA0024.jpg


Should hopefully be receiving my horns over the coming days along with various clips. My fuel filter is still on the passenger seat waiting to be fitted haha. The camping blanket is great for laying down on my garage floor so I've kept it in the MR2 for now. I will probably pick up some screws tomorrow and some 8 mm bolts so I can try fitting those cowls again, they just seem to be too big and don't seem to want to line up with the holes, so I must be doing something wrong.

Also looks like my fuel gauge isn't working... could be the sender as it's constantly showing empty and it's had 10L of fuel in it over the last week or so. Apparently you can access it from between the shifter and the ashtray (where I happened to find 3 extinguished cigars and a load of ash!!) but I got as far as taking the shifter off, the cover off the centre console and taking the ashtray out then I ended up scratching my head because I didn't know where to go from there.
 
Last edited:
I have a vague memory of taking the whole headlight assemblies out when fixing the motors / re doing covers etc but it was a long time ago and I can't properly tell you why now

Your car has a turbo engine lid but everything else looks standard na
 
Thanks for your reply Rodenal,

I have watched a few more videos of removing the headlight assembly, but it's best to get the right fixings first as only one bolt is holding each of the covers on. It looks like the cowls go underneath the cover, so that's a start, maybe putting the covers on first will give me correct orientation.
 
Your 2 looks like a standard sonic shadow Rev5 or Rev4 with Rev5 alloys & spoiler. With the turbo engine lid and a pair of bomex scoops.

The only problem with 16's is getting good tyres in the right sizes (205/45/16 & 225/45/16). This was the main reason i went with 17's with Goodyear Eagle F1's (various types over the years) on them, with no complaints. My 15's used to have Toyo's that were fine too.

I wouldn't be so sure your fuel gauge is bad, until the tank has been filled to the max.

They have a 55 litre tank, the fuel light comes on at 40 litres used. This was the same on both rev3 turbo's i've owned, i guess it might be different on UK cars?

EDIT: the rear x-brace was standard on Turbo's & T-Bar's.
 
Last edited:
Thanks for your reply Spaceman,

I'm not sure when the turbo engine lid and bomex scoops were put in, but given the amount of dirt they seem to have accumulated I reckon they have been on there for a good few years.

Did you have to do any work to the suspension or arches to accommodate the 17s?

That is a good point - I'll fill it up once it's MoT ready. I have read that the gauge is terribly slow at updating, but I don't seem to have a low fuel light either - unless I have a problem with that sensor on the fuel tank or it is still over the 15 litre threshold.

I'm not looking forwards to removing the horns. I'll probably have another go with the lights on Sunday, I still need to check over the braking system as well. A friend of mine is looking to help me with the welding in the next couple of weeks, so once that is done along with the horns and I am happy with the brakes and tyres it's going in for it's MoT. I might quickly check over the track rod ends and springs as well prior to the MoT. I am excited and worried at the same time, if that makes any sense!
 
Those bomex scoops are really not doing any good ajd might actually.have a negative effect on engine temps whilst doing nothing to the intake temps.

Realistically they are meant for a turbo to get more cool air to the intake area (with a cone or enclosed box) and the intercooler which would be o the right hand side.

The car actually sucks hot air up and out the engine vent slats but with the bomex there they might be effecting that.
 
Thanks for your reply The Running Man,

I am concerned with what you've posted about the bomex scoops - and I can see where they might have a negative impact on my MR2 after what you've said :eek:

I'm going to look around for some replacement bonnet panels and hopefully I can get a matching pair and then I need to decide if I wish to sell the bomex scoops or keep them for any potential engine swaps. I don't think they're worth a great deal but I haven't checked what used ones go for.

I also bought some M5 20 mm bolts today, with a bit of luck they'll be the correct size for my headlight cowls which I am going to have a look at reinstalling tomorrow - hopefully I won't get caught in the rain too much - but it does look nasty out tomorrow.

On Monday I plan to replace the fuel filter, check and/or replace the air filter and replace the horns. I checked my spark plugs today and they look biscuit-y but I think they are a bit old as I can see some wear on them, so they'll need replacing - even though the engine runs okay, a new set of plugs is a good idea.

On Wednesday, if I don't fit it in on Monday, I plan to check my entire brake system - disc thickness, pad wear, hose condition and caliper function, before putting new fluid in. Sure it stops okay at the low speeds in and out my garage, but that doesn't mean it's going to be MoT fit. Whilst the wheels are off I can give the rear sway bar a clean up and the inner/outer ball joints a cautionary inspection as well.

Once I've replaced any worn brake parts, it will just be a case of replacing all the tyres and welding the hole then it's MoT time :eek::D
 
I've actually seen the effect once when a lot of small light pieces of seeds had fallen from trees onto the back 9f my car.

The faster I drove the higher they would float - levitate I could see them in my rear window as the air from under the car was pushing them up.

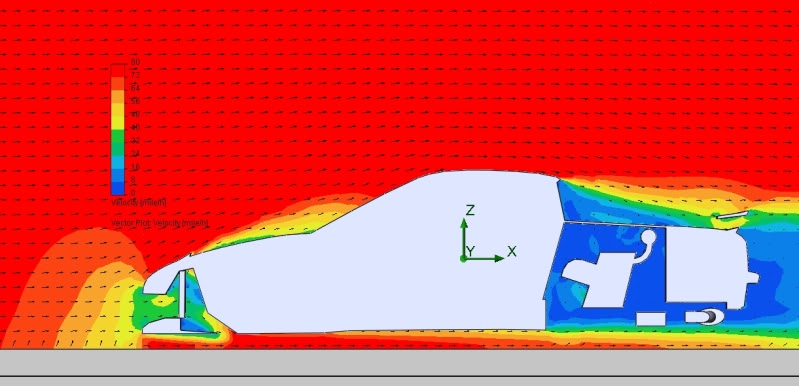
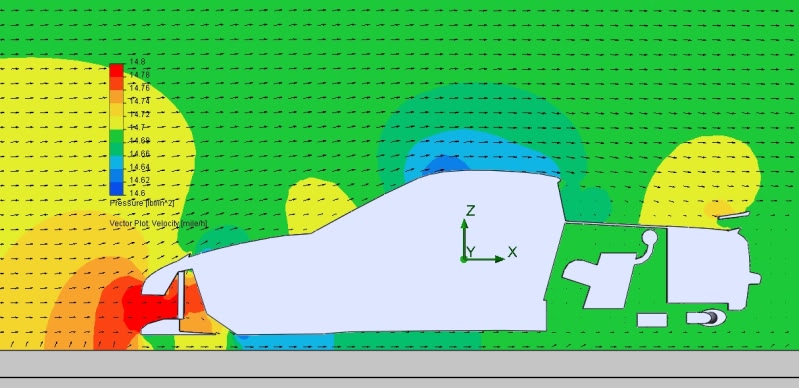
Not sure if this shows it but what this does show is best frunk bonnet scoops actually help loads as they stop front end lift at speed and help cooling air flow through the radiator.

bordervelocity.jpg


borderpressure.jpg
 
I think I've managed to decipher both the diagrams, thanks for adding those The Running Man! I may add some bonnet scoops in at some point, to help the radiator out but that will be down the line.

The good news is... I have managed to source a pair of bonnet panels which should be arriving in the next few days and it should be a case of just screwing them in after I remove the Bomex intakes. I am not sure how good the colour match is, but I can sort it out later - one of my headlight covers is the wrong colour and I might look around for the correct coloured one once I have sorted everything else out on the car and got the MoT completed, or I might just spray it myself.

Unfortunately, the M5 bolts I purchased do not fit, the thread is just a little too wide for the headlight covers - so I am probably going to look at some different bolts tomorrow once I have the intake system and fuel filter out.

I plan to use the M5 nuts and bolts on a little idea of mine - bottom and top acrylic covers; the top one can be removable and the bottom one can stay on, at least protecting water from kicking up to the alternator pulley. I will of course need to remember to remove the top cover whenever I run the engine, but to me a bottom and top engine cover should protect the engine components from too much water ingress.

I have also managed to figure out how the cowls go back on - I did have the wrong mounting holes, so I will be getting some screws tomorrow. In any case, my headlamps should be completely sorted by tomorrow and my fuel filter. The fuel filter is meant to be a 30 minutes to 1 hour job, but I don't rate my chances, I am going to allow myself 2-3 hours at least. Also, the fuel is low enough now for the fuel filter to be removed - in fact, I'm quite sure my tank is almost empty so if I do have a leak, if I don't clamp the small fuel line off properly; I will not have anything to worry about. Not looking forwards to lying on my wet and cold garage floor tomorrow, but I need to do that fuel filter as well as those spark plugs.

Big day tomorrow!!
 
Thanks for your reply The Running Man! I definitely don't have that Toms airbox on my car, I know that because it was an absolute PITA to get it out and I had to remove the strut x-brace to get at it!!

Today has been a semi-productive day, in a nut shell, my new horns work, I replaced the fuel filter, air filter and the spark plugs.

Here is the long story:

(1) Removing the air box, resonator box and all attachments (before)

Removal_of_AirBox.jpg


After:

Removal_of_AirBox_2.jpg


(2) Clamping the bottom and top fuel hoses with a G-Clamp and Mole grips:

Removal_of_AirBox_3.jpg


(3) Old and new fuel filters

Old_and_New_Fiel_Filters.jpg


I made the mistake of undoing the bracket bolts before undoing the bottom hose, it made my job a whole lot longer and I had to put the bracket bolts back in, until I cracked the bottom banjo bolt. The top bolt was almost as hard to crack and in both cases, only a trickle of fuel came out - either my tank was almost empty or I did a good job of clamping the rubber sections of the hoses with the G-Clamp and Mole grips. By this point, my mobile battery just died, but lasted long enough for me to do this:

(4) The first bodge of the day, bending the brackets on the new fuel filter so my banjo bolts and solid fuel pipes would fit. I was quite unhappy when I saw the pipe didn't fit as the hole cut outs were too narrow - so I thought, I'll just bend it. I could have sent it back and got another one, but at this point I was 2-3 hours in and my patience was wearing thin. I had already dropped the bottom banjo bolt and lost it four times, almost lost all the copper crush washers just as many times!! On a wet, cold and muddy garage floor :(

Fuel_filter_Bodge.jpg


Then the fun job of putting it all back together arrived, I had a right old problem getting the pipe back in, to the point that I needed to remove the X-Strut brace. Luckily a very helpful neighbour saved me by getting me a can of coca cola and some home made rock cakes, I had not eaten since I got up and it was already 1:30 pm!

A few other photos taken earlier in the day:

(5) New Fram Air Filter and New Denso Spark plugs. Unfortunately, the Iridium spark plugs I wanted were out of stock, so I made do with these ones; knowing they'll need doing again in 20-30k miles:

New_Air_Filter_Spark Plugs.jpg


(6) Old and new Air Filters compared, the new one looks larger, but that is a trick of the camera, it actually fits:

Old_and_New_Air_Filters.jpg


(7) Old Spark plugs, you can see the discolouration on the porcelain in the first two spark plugs and the re-gap on the third one when I dropped it a few days ago. What the photo doesn't show is some of the wear between the ground electrode and centre electrode. The centre electrodes are heavy with carbon fouling - probably due to idling and not doing anything else. But there wasn't any oil fouling on the spark plug, which is a good sign!

Old_Sparkplugs_1.jpg


(8) Charged up my phone and was able to take pictures again yay! New horns and clips which arrived today:

New_Horns_1.jpg


(9) & (10) Current location of standard horns:

Old_horn_left.jpg

Old_Horn_Right.jpg


(11) & (12) New horns. The previous two photos show where I cable tied the horn cable to the body work. This was the second bodge of the day - I ended up extending the powered positive around the front of the car to the front trunk, where I had placed the two horns:

New_Horn_left.jpg

New_horn_Right.jpg


What I ended up doing was looking for two bolts on the body work inside the front trunk, which I found after managing to completely shear one off, oops and used the supplied horn brackets on these. The section where the spare wheel frame/holder bolts on to the chassis on the body work acted as a new earth as can be seen on photo # 11.

I was able to extend the positive wire using female and male spade connectors from the front of the car to inside the front trunk after finding a hole already there. The new earth was simply two of the old fuel filter washers with the wire coiled around them, quick, easy and functional. I don't have round connectors and at some point, I will replace the washer/bare wire connection on the earth with ring connectors once I have the measurements I need.

Not the prettiest of jobs but very functional at least, until a point when I have the time to drop the front bumper and take the old horns off, as it's the only way to get at the horns. If I hadn't spent so long on the fuel filter, I would have been able to drop the bumper today.

Going back to the fuel filter/air filter/spark plugs - I checked over everything and the engine is running nicely and there are no leaks from the fuel filter. I fastened the top and bottom 17 mm banjo bolts to 22 nm with my torque wrench as specified on various forums and how to guides so no way that's going to leak!

Just this lot left to do now:

1). Headlamp cowls and covers.
2). Removing all carpets on the inside of the car.
3). Changing Bomex scoops to standard bonnet panels.
4). Checking over entire brake system.
5). Check over wheel bearings and track rod ends.
6). Remove 'foam'.
7). Welding :D
8). Drop the front bumper and put the horns in the correct place.

Looks like the welding will be done on Saturday afternoon - I'm not looking forwards to cutting out the rusty bit of the sill (which measures like 1" by 1") and seeing what horrors lurk behind, but I want to do a proper job and patch/replace any parts that need doing before filling this cavity and the other sill with Dynax S-50.

All in all, a long, hard and terrible day for working on a car, but at least some jobs are done. I'll probably book the MoT for the next few weeks once the welding is completed. Using a mobile phone torch for doing work on a car is an eye strain and very time consuming...as well as good at killing batteries. I knew I should have got some sort of bar torch with a hook today!!
 
Today the bonnet panels arrived - quicker than expected!

(1) The bonnet panels themselves:

bonnet_panels_1.jpg


They're on the dark side, but they're in very good condition and I am going to be getting a can of the correct colour coded spray at some point as I need to do one of the pop-up light covers.

(2) The bonnet panels in place:

bonnet_panels_2.jpg


I like how much more streamlined the rear looks and no issues with air flow either!!

(3) Side view of the car:

bonnet_panels_3.jpg


Personally I think I much prefer the way the car looks without the Bomex scoops. If it was a case of having larger rims on lower profile tyres, lowered suspension, turbo charged and a bodykit then the Bomex scoops would complement it, but since it's NA and all standard it doesn't really benefit aesthetically, or mechanically from the scoops.

Another tick off the list!

Tomorrow, I'm going to give the brakes a once over and the bearings and suspension components, starting from the front and then doing the back - as it's not safe to have the car on four axle stands. The headlamp cowls should hopefully now not pose a problem, and I will be getting some bolt and screw fixings tomorrow once I have measured everything.

Can't wait to get the welding and the MoT done :D
 
Just a quick update, today I managed to put the cowls back on, secure the headlight covers, check all the brakes and check the bearings.

Photo of the cowls installed correctly, you might be able to see the yellow tone of the passenger head light, which will be picked up on MoT. You can also see the great long earth wire going around the front bonnet seal!

Headlight_Cowls_Covers.jpg


I am happy with the brakes - there is a decent amount of material left on each of the discs and on each of the pads and the hoses appear damage free. The passenger headlight appears to be more yellow than the driver side headlight so I decided I am better off getting a brand new pair of replacements.

There is not much left to do now which is really awesome:

1). Replacing mismatched headlight units with new ones once they arrive.
2). Lifting up the interior carpets.
3). Removing foam sections.
4). Welding.
5). Dropping bumper to change horns over.

Time to freshen up and do some university work for the rest of the day.

Friday I plan to take the interior carpets out, replace the headlamp units and remove the foam units. I am hoping that I can get the bumper dropped as well so I can get rid of the old horns.
 
Thanks for your reply The Running Man,

Unfortunately, because the car is presently on SORN the only driving I have done is in and out of my garage :( as it's private land.

But it goes and stops and all the electrics work, haha so it will hopefully not break down on me!

Looking at the law, I can drive to the MoT station without tax, and there is one 300m or so away from my garage - as long as I have a pre-booked MoT test.

The welding may have to be moved but it gives me more time to get the other jobs sorted. Then I'll pre-book an MoT and cross my fingers!!
 
Thanks for your reply The Running Man!

I remember trying and failing to recondition my old ZR-7 calipers - I ended up sending them away to be reconditioned. Although there are no signs of the brakes binding, I know rust likes to collect around the pistons, as well as the slider on most calipers. Trouble is I haven't actually driven it anywhere which would allow the brakes to warm up, as that would indicate caliper problems.

I know I can get a whole set for under £400, not sure if I can go any cheaper though. Hoses are something like £60 for a set of steel braided ones though standard rubber ones will probably do the job.

I will double check them on Friday more thoroughly though but it's more than likely they'll need doing along with fresh fluid.
 
Last edited:
Back
Top Bottom