

You are using an out of date browser. It may not display this or other websites correctly.
You should upgrade or use an alternative browser.
You should upgrade or use an alternative browser.
Random 3D printing chatter
- Thread starter Cenedd
- Start date
More options
Thread starter's posts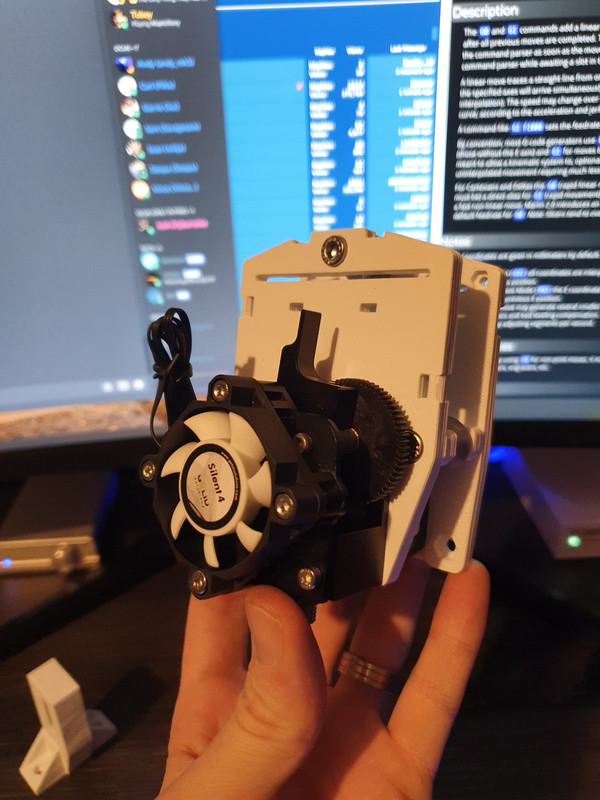
Your own brand")
Well before fitting it I though i would just rock a few more upgrades:
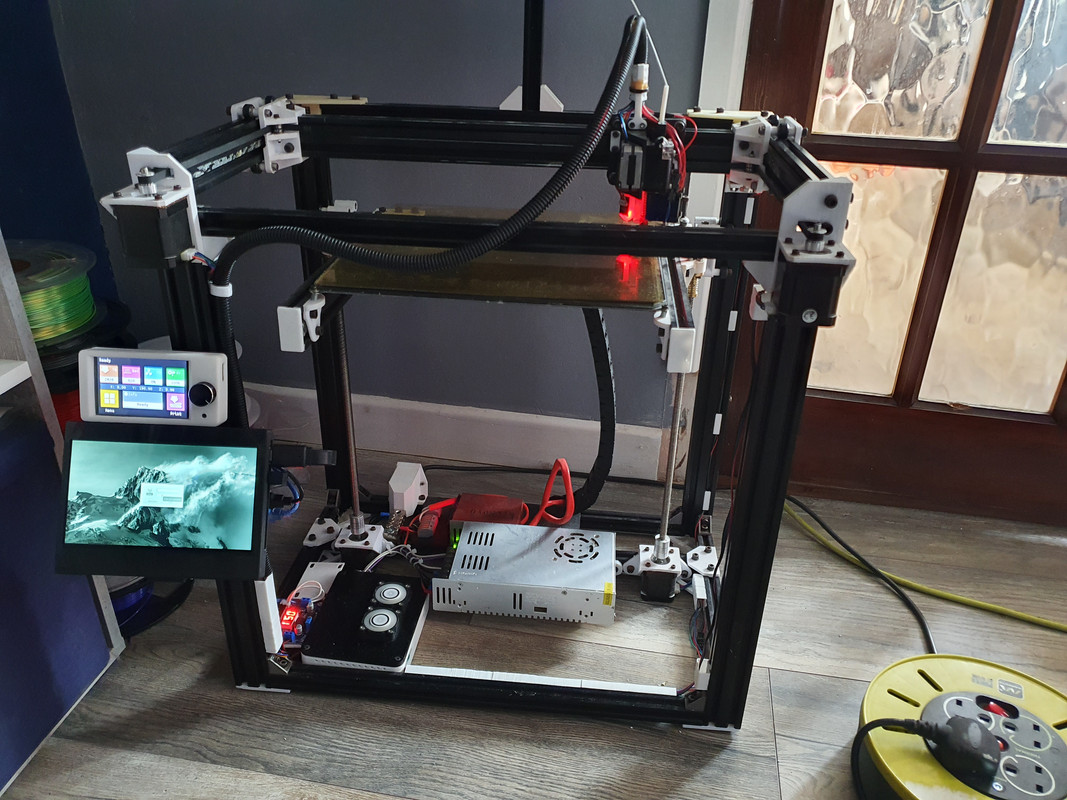
Still working on some other bits but it is very almost finished.
I removed the leds because i have a plan:
also you did a pretty god job levelling the bed:
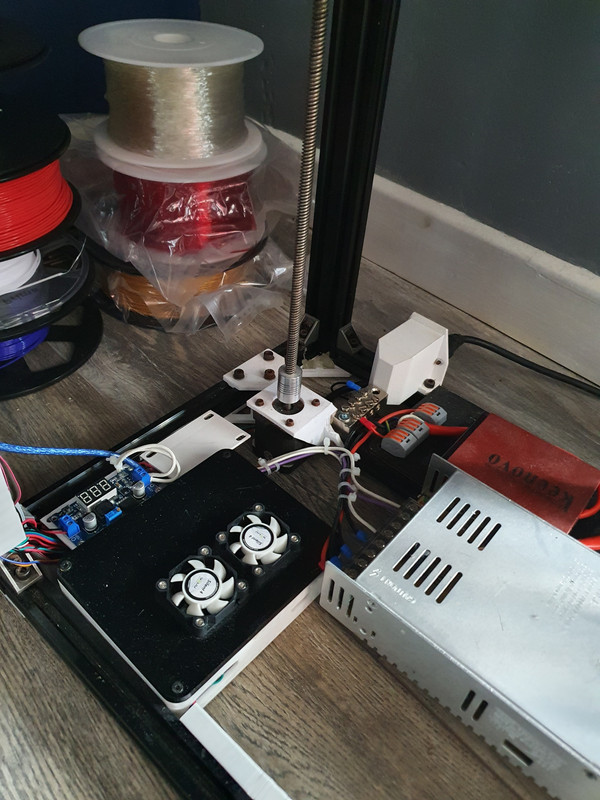
Edit: Thought id just add a pic of it all cable managed:
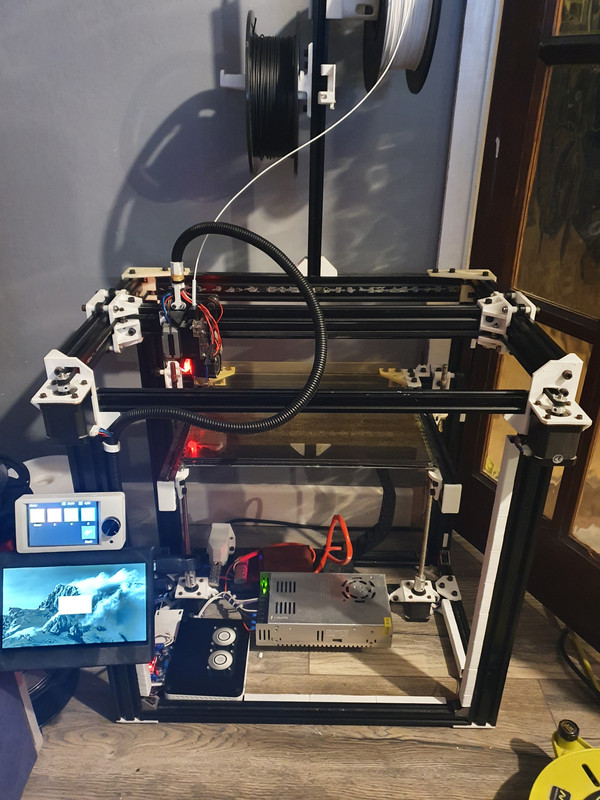
Next update will be when the new extruder and leds go on.
Last edited:
Your own brand
Fixed all of the extruder microstepping issues
 Worked out my drivers (TMC2208) were missing a resistor on the underside which meant UART wasn't working correctly. Just soldered wires across all the drivers and it's corrected the issues. this means calculations are now as expected
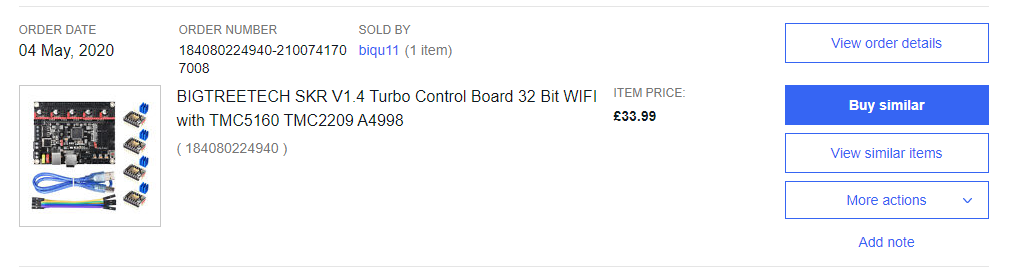
 @Vince Nice. You seem to be getting a lot farther a lot quicker than I am. I now have an SKR 1.4 Turbo and 2209 drivers and a queue of Marlin vids to watch! I'll get there eventually.
I also got the replacement roll of PETG and printed a part I'd printed lots of in PLA. Ran it at 240 end, 70 bed, 100% fan. I thought it would be nice to have a stronger version of the item and a good test. Looked lovely. Seemed more flexible though....which I was surprised at. Gave it a twist and it mostly delaminated - all the infill did totally but the perimiters held. I've since run a temp tower and I'm going to try again at 235 end, 80 bed and no fan. Well, I was going to but Fusion threw all its toys out the pram and wouldn't run (crashed on start) on my account on any PC. I've managed to get that sorted out but absolutely everything I try to do lately is just a cascade of failures andI'm running I've run out of sanity!
I also got the replacement roll of PETG and printed a part I'd printed lots of in PLA. Ran it at 240 end, 70 bed, 100% fan. I thought it would be nice to have a stronger version of the item and a good test. Looked lovely. Seemed more flexible though....which I was surprised at. Gave it a twist and it mostly delaminated - all the infill did totally but the perimiters held. I've since run a temp tower and I'm going to try again at 235 end, 80 bed and no fan. Well, I was going to but Fusion threw all its toys out the pram and wouldn't run (crashed on start) on my account on any PC. I've managed to get that sorted out but absolutely everything I try to do lately is just a cascade of failures and
@Vince Nice. You seem to be getting a lot farther a lot quicker than I am. I now have an SKR 1.4 Turbo and 2209 drivers and a queue of Marlin vids to watch! I'll get there eventually.
I also got the replacement roll of PETG and printed a part I'd printed lots of in PLA. Ran it at 240 end, 70 bed, 100% fan. I thought it would be nice to have a stronger version of the item and a good test. Looked lovely. Seemed more flexible though....which I was surprised at. Gave it a twist and it mostly delaminated - all the infill did totally but the perimiters held. I've since run a temp tower and I'm going to try again at 235 end, 80 bed and no fan. Well, I was going to but Fusion threw all its toys out the pram and wouldn't run (crashed on start) on my account on any PC. I've managed to get that sorted out but absolutely everything I try to do lately is just a cascade of failures andI'm runningI've run out of sanity!
HaHa I had an issue where my drivers were missing a resistor so I literally soldered them this morning to bridge where the resistor should be... This finally got uart mode working properly on the drivers but I also have 2209's coming so I may upgrade
Really the marlin part is super easy and there isn't a whole lot to it once you get started
Trust me I know your frustrations I ran with a mirrored Y axis for a while as I just couldnt get my head around what was wrong. Then one night it just came to me, as it came to me what the problem might be last night with the microstepping sure enough this morning that is now sorted. Some of these things just take a little time to process and work out. Honestly if you want help with the 1.4 turbo then I know the board back to front now and am more than happy to spend some time. Thanks Vince. Appreciate the offer. I may well take you up on it if I get stuck but I'd like to figure out most of it myself - not because of masochistic tendencies you understand, just that if I've worked it out, I'll understand it and be able to fix issues rather than just hassling you when the slightest thing doesn't work That's partly why I went with a new board rather than trying to bully the 8-bit Creality one into running my new extruder. It's currently this big black box of unknown stuff that I don't fully understand and that bothers me.....but not as much as being oblivious of how much there is that I don't yet understand! I'm getting there....slowly. I figure I'll run it on a 12V PSU to start as I have one spare and see how the stepper in the extruder behaves with the firmware I cobble together. Then I can start adding in extra steppers and make sure they run in the direction I'm expecting.
Sensorless homing was a big gotcha for a while (do I cut the pin or leave it) but I think it may end up being a non-issue as I think the endstop sensors still work, just not the Xdet pin so I think I can work round it. Stupid design requiring an irreversible (or at least tricky) pin cut.
That's partly why I went with a new board rather than trying to bully the 8-bit Creality one into running my new extruder. It's currently this big black box of unknown stuff that I don't fully understand and that bothers me.....but not as much as being oblivious of how much there is that I don't yet understand! I'm getting there....slowly. I figure I'll run it on a 12V PSU to start as I have one spare and see how the stepper in the extruder behaves with the firmware I cobble together. Then I can start adding in extra steppers and make sure they run in the direction I'm expecting.Sensorless homing was a big gotcha for a while (do I cut the pin or leave it) but I think it may end up being a non-issue as I think the endstop sensors still work, just not the Xdet pin so I think I can work round it. Stupid design requiring an irreversible (or at least tricky) pin cut.
Thanks Vince. Appreciate the offer. I may well take you up on it if I get stuck but I'd like to figure out most of it myself - not because of masochistic tendencies you understand, just that if I've worked it out, I'll understand it and be able to fix issues rather than just hassling you when the slightest thing doesn't work
Sensorless homing was a big gotcha for a while (do I cut the pin or leave it) but I think it may end up being a non-issue as I think the endstop sensors still work, just not the Xdet pin so I think I can work round it. Stupid design requiring an irreversible (or at least tricky) pin cut.
Yep I noticed that on the 2209 - Just make a decision and chop this pin... sure why not! Like you I bought the skr 1.4 turbo and drivers back in jesus I had to check:
But yea the board sat there for about 6 months before I even had a play. Once you get into it, it really isn't as daunting as you might think
There are a few differences in the config between 8 and 32bit but its not massive amounts.Ah, you mean that once you understand it all, it's perfectly comprehensible!
And, while I'm at it, I was wrong. The "separate" stop headers I had in my brain share the pin with the diag pin for stallguard so you do have to chop or do nasty things with reassigning unused pins from elsewhere.....which I suspect is just asking for future trouble. I'm leaning towards chopping the pin and killing stallguard since I already have limit switches for homing and they're supposed to be significantly more accurate. Definitely up for opinions before chopping though!
And, while I'm at it, I was wrong. The "separate" stop headers I had in my brain share the pin with the diag pin for stallguard so you do have to chop or do nasty things with reassigning unused pins from elsewhere.....which I suspect is just asking for future trouble. I'm leaning towards chopping the pin and killing stallguard since I already have limit switches for homing and they're supposed to be significantly more accurate. Definitely up for opinions before chopping though!
Ah, you mean that once you understand it all, it's perfectly comprehensible!
And, while I'm at it, I was wrong. The "separate" stop headers I had in my brain share the pin with the diag pin for stallguard so you do have to chop or do nasty things with reassigning unused pins from elsewhere.....which I suspect is just asking for future trouble. I'm leaning towards chopping the pin and killing stallguard since I already have limit switches for homing and they're supposed to be significantly more accurate. Definitely up for opinions before chopping though!
Exactly although I may have a slight head up as I worked as a dev for quite a few years and code is code right? And I already run visual studio pro so the visual studio piece didn't feel like a huge stumbling block. I guess what im trying to say is your millage may vary but it isn't rocket science
today I soldered bridge wires across the back of my 2208's (they didnt work properly from the factory) so yea the 2209 thing I guess will be similar. you can test the drivers though by sending gcode and you get back a reply something like this:
Code:
Send: M122
Recv: axis:pwm_scale/curr_scale|flags|warncount
Recv:         X    Y    Z    E
Recv: Enabled        false    false    false    false
Recv: Set current    850    850    800    800
Recv: RMS current    1491    1491    1436    1436
Recv: MAX current    2102    2102    2025    2025
Recv: Run current    26/31    26/31    25/31    25/31
Recv: Hold current    13/31    13/31    12/31    12/31
Recv: CS actual    0/31    0/31    0/31    0/31
Recv: PWM scale
Recv: vsense        0=.325    0=.325    0=.325    0=.325
Recv: stealthChop    false    false    false    false
Recv: msteps        256    256    256    256
Recv: tstep        0    0    0    0
Recv: PWM thresh.
Recv: [mm/s]
Recv: OT prewarn    false    false    false    false
Recv: triggered
Recv:  OTP        false    false    false    false
Recv: pwm scale sum    0    0    0    0
Recv: pwm scale auto    0    0    0    0
Recv: pwm offset auto    0    0    0    0
Recv: pwm grad auto    0    0    0    0
Recv: off time    0    0    0    0
Recv: blank time    16    16    16    16
Recv: hysteresis
Recv:  -end        -3    -3    -3    -3
Recv:  -start        1    1    1    1
Recv: Stallguard thrs
[09:38]
Recv: uStep count    0    0    0    0
Recv: DRVSTATUS    X    Y    Z    E
Recv: sg_result
Recv: stst        *    *    *    *
Recv: olb
Recv: ola
Recv: s2gb
Recv: s2ga
Recv: otpw
Recv: ot
Recv: 157C
Recv: 150C
Recv: 143C
Recv: 120C
Recv: s2vsa
Recv: s2vsb
Recv: Driver registers:
Recv:         X    0x00:00:00:00     Bad response!
Recv:         Y    0x00:00:00:00     Bad response!
Recv:         Z    0x00:00:00:00     Bad response!
Recv:         E    0x00:00:00:00     Bad response!
Recv:
Recv:
Recv: Testing X connection... Error: All LOW
Recv: Testing Y connection... Error: All LOW
Recv: Testing Z connection... Error: All LOW
Recv: Testing E connection... Error: All LOW
Recv: ok
As you can see mine were all throwing errors and i had them set up perfect to the instructions.. The problem was this resistor (highlighted) was missing off of the back of the drivers:
https://i.~ibb.co~/JxGbdNm/Capture.jpg
So i soldered tiny wires in and after that we was golden:
Code:
Send: M122
Recv: axis:pwm_scale/curr_scale|flags|warncount
Recv:         X    Y    Z    E
Recv: Enabled        false    false    false    false
Recv: Set current    700    700    800    600
Recv: RMS current    673    673    795    581
Recv: MAX current    949    949    1121    819
Recv: Run current    21/31    21/31    25/31    18/31
Recv: Hold current    10/31    10/31    12/31    9/31
Recv: CS actual    10/31    10/31    12/31    9/31
Recv: PWM scale
Recv: vsense        1=.18    1=.18    1=.18    1=.18
Recv: stealthChop    true    true    true    true
Recv: msteps        16    16    16    16
Recv: tstep        max    max    max    max
Recv: PWM thresh.
Recv: [mm/s]
Recv: OT prewarn    false    false    false    false
Recv: triggered
Recv:  OTP        false    false    false    false
Recv: pwm scale sum    34    32    24    49
Recv: pwm scale auto    0    0    1    0
Recv: pwm offset auto    100    94    58    157
Recv: pwm grad auto    23    24    24    21
Recv: off time    3    3    3    3
Recv: blank time    24    24    24    24
Recv: hysteresis
Recv:  -end        -1    -1    -1    -1
Recv:  -start        1    1    1    1
Recv: Stallguard thrs
Recv: uStep count    56    984    680    456
Recv: DRVSTATUS    X    Y    Z    E
Recv: sg_result
Recv: stst
Recv: olb
Recv: ola
Recv: s2gb
Recv: s2ga
Recv: otpw
Recv: ot
Recv: 157C
Recv: 150C
Recv: 143C
Recv: 120C
Recv: s2vsa
Recv: s2vsb
Recv: Driver registers:
Recv:         X    0xC0:0A:00:00
Recv:         Y    0xC0:0A:00:00
Recv:         Z    0xC0:0C:00:00
Recv:         E    0xC0:09:00:00
Recv:
Recv:
Recv: Testing X connection... OK
Recv: Testing Y connection... OK
Recv: Testing Z connection... OK
Recv: Testing E connection... OK
Recv: ok
I dont know how the machine was producing the prints it was before but right now this seems to have solved all of my weird firmware issues
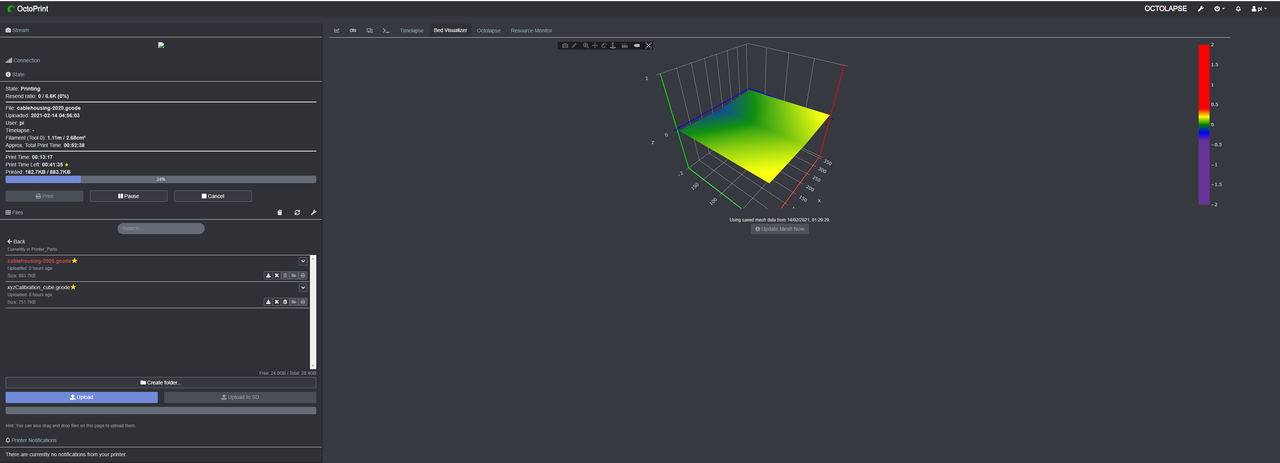
And if the print it's doing now is anything to go by I'm super happy with the results.And the first print with everything seemingly now working:
Last edited:
@Vince You've done an awesome job dude.
I have gone back to stock CR-6 as the firmware for the BTT CR6 was crap.
When doing a ABL it hits the bed to hard. So the mesh is all over the place.
I have reported it to BTT gitgub...but nothing so far.
I have gone back to stock CR-6 as the firmware for the BTT CR6 was crap.
When doing a ABL it hits the bed to hard. So the mesh is all over the place.
I have reported it to BTT gitgub...but nothing so far.
@Vince You've done an awesome job dude.
I have gone back to stock CR-6 as the firmware for the BTT CR6 was crap.
When doing a ABL it hits the bed to hard. So the mesh is all over the place.
I have reported it to BTT gitgub...but nothing so far.
I know i'm a mad man but honestly I would have redone the firmware from scratch on that bad boy! Then I would have spent a month fixing all my **** ups.
I know i'm a mad man but honestly I would have redone the firmware from scratch on that bad boy! Then I would have spent a month fixing all my **** ups.
It looks like BTT don't do support for there CR6 V1 motherboard.
Going to ask PayPal for a refund.
Is there an EASY way to turn the bin file back to normal?
It looks like BTT don't do support for there CR6 V1 motherboard.
Going to ask PayPal for a refund.
Time for a 1.4 turbo and setting up the firmware from scratch? Or just keep the board and do a fresh marlin?
Time for a 1.4 turbo and setting up the firmware from scratch? Or just keep the board and do a fresh marlin?
I have gone back to the Creality motherboard and screen.
I bought it to have fun. And not be a pain
I have gone back to the Creality motherboard and screen.
I bought it to have fun. And not be a pain
Aye who said fighting with firmware is not fun? - Today (after this 5 hour print) I may very well fit up my new extruder! I am seriously considering making it a dual extrusion machine... one bowden with the titan and one direct with the titan aero...
Aye who said fighting with firmware is not fun? - Today (after this 5 hour print) I may very well fit up my new extruder! I am seriously considering making it a dual extrusion machine... one bowden with the titan and one direct with the titan aero...
That would be cool.
That would be cool.
Its possible... would just need a mount for a v6 on the current aero bracket... get them super close and see what happens.