

You are using an out of date browser. It may not display this or other websites correctly.
You should upgrade or use an alternative browser.
You should upgrade or use an alternative browser.
What "man jobs" have you done today?
- Thread starter jaybee
- Start date
More options
Thread starter's posts


Following my previous post I've cut my new plaster back so I can open my door  . Plasterer coming back next week so can redo those bits...


Also had the plumber in last week which allows me to put in sound insulation into my en suite. This is 80 quid of rockwool sound insulation and a load of spare bits in the loft... Pretty expensive!


. Plasterer coming back next week so can redo those bits...
Also had the plumber in last week which allows me to put in sound insulation into my en suite. This is 80 quid of rockwool sound insulation and a load of spare bits in the loft... Pretty expensive!

Been trying to solve a condensation issue at the front of the house. It’s a bay window with three air bricks.
I’m getting condensation on the inside on the skirting and just the bottom bit of plaster. You can see water droplets on the skirting it’s that cold.
I first thought it was the carpet shrinking and compressing, the gap between the skirting and floor and the floorboards perhaps being slightly short allowing cold air to come up from the floor void. When knocking on the skirting you can hear its holllow behind.
Not wanting to remove it all, I drilled 8mm holes approx 100mm apart which confirmed the void. Used expanding foam to fill a quick squirt in each hole - it won’t conduct heat/moisture therefore thought this appropriate.
I’ve not done the full width of the bay window yet as wanted to let it expand & set.
Now when looking from outside through the middle and RH air bricks you can see the internal brick through, but the LH one you can see the back of the skirting and a small amount of foam - as I’ve not gone all the way over there yet. Now you can hear the skirting is more solid with the “knock test”. If successful I’ll just clean the holes out, sand and filler then repaint.
Not a surprise I am having condensation issues, if cold air is just blowing straight in.
There is a cavity wall - it’s not insulated and no plans to insulate it. And I know the floor has a void under it - initially I thought it was just coming up from below the floor.
Do you think what I am doing is appropriate? The foam hasn’t pushed out into the cavity, I’ve not measured the gap but would estimate the foam to be protruding maybe 25mm into the space behind the skirting.
With the majority of the air bricks being here there must be a lot of flow through hence the cold spots.

Soldato
- Joined
- 24 Sep 2007
- Posts
- 5,263
Do you think what I am doing is appropriate? The foam hasn’t pushed out into the cavity, I’ve not measured the gap but would estimate the foam to be protruding maybe 25mm into the space behind the skirting.
I'm not a builder or expert, but if you partially fill the cavity with foam, then potentially the foam will now get cold, so it will get mouldy. It seems like a partial solution to me.
It seems you have a lot of airbricks for this area. Just a thought, but a strategically placed plant pot in front of the left and right might reduce the cold airflow in and thus solve the condensation issue, and you still have the third airbrick open. Couldn't say whether this meant the bay did not have enough ventilation though, so a better solution is probably required.
Last edited:
Permabanned
- Joined
- 7 Aug 2017
- Posts
- 2,141
- Location
- by the tower the one up north ..
why have you got so many air bricks ..?? 3 on the bay 2 by the front ?? how many more ? is there water under the house how deep is it from floor board to dirt ? very strange ...Been trying to solve a condensation issue at the front of the house. It’s a bay window with three air bricks.
Exactly this, except so wouldn't call it a nogging because it's not stuck between two other pieces to strengthen them
Depending on the thickness of the gap/plaster/board, I'd put some sturdy ply in the wall and plaster over. That way you're going into something regardless of how deep you go.
")
Over the last week I've cut a rectangle out of the plasterboard, removed all the damaged bits, hoovered out the gaps and holes and then assessed.
I've now used resin and sleeved bolts, cut some threaded rod and as suggested bolted a piece of wood in position. Expanding foam filler around to stop the draught and then another piece of wood over the top. Each time drilling holes for the threaded rods. After suspending a weight from the bracket (15st me) I'm confident this ain't going nowhere.
The bracket is back up, the telly is back up and made good. Now just a bit of paint needed but that can wait.
Ah, sorry, I’m not filling the cavity with foam. I’m looking to fill the void between the skirting and the inner brick with foam. It must be nailed onto batons in a few locations but the rest of it has a gap. As to why there isn’t an inner brick behind the LH air brick I don’t know. I have an inspection camera but just illuminating behind the air brick is sufficient. I can see the end of the wall, the rear of the skirting and a bit of a hole/void down under the house. How I can insulate the rear of the skirting in this spot is a bit of a puzzle. Possibly use a long straw and foam the rear of it and hope it sticks. Even 10mm thick would make a massive difference.I'm not a builder or expert, but if you partially fill the cavity with foam, then potentially the foam will now get cold, so it will get mouldy. It seems like a partial solution to me.
It seems you have a lot of airbricks for this area. Just a thought, but a strategically placed plant pot in front of the left and right might reduce the cold airflow in and thus solve the condensation issue, and you still have the third airbrick open. Couldn't say whether this meant the bay did not have enough ventilation though, so a better solution is probably required.
Also why there are three air bricks I couldn’t tell you. There is a further half air brick to the left out of shot and more on the right you can see.
The house is 1930s and the bay window original as far as I can tell. Matches my neighbour/adjoining house in design/construction so nothing to suggest it’s been added later.
Distance from underside of the floor to the soil underneath I’d say would be a 400-500mm. It’s 4-5 courses of bricks off the top of my head.
Last edited:
@Berger Its not on a hill is it? My 1930s has a few quirky issues like the front elevation being slightly too high (my floor level is below dpc...). When I reattached my skirting I filled the void with rockwool as it doesn't bridge moisture, and fitted a deflector for the air brick like what a modern house would use in the cavity - like an air periscope. The skirting is then attached just to the bit of wall that is above DPC level, with a void so it doesn't touch the below dpc. This ensures the dpc itself.
This would explain why they did it like they did, however without something to stem the air flow it'll go super cold like you've found.
----
I had a bash at getting to the next nasty bit, running low on floor now. Need to screed the utility but I may just try and get a gradient. Tbc - can think about it now I'm this far!
Last edited:
I think what you’re saying is correct DLockers. I can see down to the cavity under the floor and yes in a new house you’d have a telescopic vent there. As it is it just blows in & down. Maybe they ran out of space or something with the LHS as it’s closer to the corner of the wall. Provided the air can get down under the floor still I can’t see any issues.
Will do some further investigation.
Will do some further investigation.
Last edited:
Built the power rack and some wall storage for the weights I picked up this week.
200mm metal furniture legs bolted to 5x2 timber. The Rothley furniture legs from Screwfix seem to be the go to on various gym forums for this job so hopefully holds up.
I really need to invest in an SDS drill, after struggling to drill the 10mm holes in the masonry for the bolts I went and borrowed the the father in laws and was done in minutes.
Still need to build some storage for the 1 inch plates and the various bars and accessories
Last edited:
Further investigation. The brick behind the air brick had fallen into the subfloor.
I cut the skirting using a multi tool, retrieved the brick, found a 1930s Beano mag.
There isnt really anything to fix it to without destroying half the house.
I’ll put a piece of 50mm polystrene in the gap, foam it to hold it in place and then put the skirting back on with foam.

I cut the skirting using a multi tool, retrieved the brick, found a 1930s Beano mag.
There isnt really anything to fix it to without destroying half the house.
I’ll put a piece of 50mm polystrene in the gap, foam it to hold it in place and then put the skirting back on with foam.
Seems it was wrong wardrobe - she meant one next to it.Sitting here puffin and huffin and wife said if you are so bored go and tidy up your wardrobe - She said it's full of junk.
I thought what a good idea -When I finished I had a empty spray can and unopened pack of wallpaper paste.
So I think she was talking about her wardrobe with junk in. See men don't hoard stuff")
That is my overflow storage shelves for garage and shed..
Did find a lot of things I thought I had lost -Digital level for one - replacement scraper blades and list goes on.
I binned 13 yr old unopened box of filler -half a box -big rolls of double sided foam draught excluder of about same vintage - all together a large heavy duty rubbish bag full -went in dustbin.
I got so keen I carried on with drawers and found my two pair of sealskin mitts and loads of beany hats for winter.
It's quite exciting finding bits you forgot you had. - Put everything back nice and tidy - Will now do this every year just to remind me what junk I am hoarding.
Nice simple conclusion (y).Further investigation. The brick behind the air brick had fallen into the subfloor.
I cut the skirting using a multi tool, retrieved the brick, found a 1930s Beano mag.
There isnt really anything to fix it to without destroying half the house.
I’ll put a piece of 50mm polystrene in the gap, foam it to hold it in place and then put the skirting back on with foam.
I would have just mortared the brick back in as best I could tho.
Agreed if I had something to bed it onto. The brick appeared to only be supported at the sides and from above. It wasn’t sitting on anything… probably why it’s fallen down as the mortar has weathered.
I’d need a hole about three times the size to get at it properly. Do this as a one day job for now, to revisit in future if required, maybe in a summer month!
I’d need a hole about three times the size to get at it properly. Do this as a one day job for now, to revisit in future if required, maybe in a summer month!
Typical run of the mill post-IKEA visit jobs ...
Mirror fitted in youngest daughter's bedroom

Then the only remaining "original" light (in the cloakroom) from when we moved in 6 years ago

It's been hanging like that for about 18monghs to 2 years ....
New light


More than enough for today
Mirror fitted in youngest daughter's bedroom
Then the only remaining "original" light (in the cloakroom) from when we moved in 6 years ago
It's been hanging like that for about 18monghs to 2 years ....
New light
More than enough for today
Usual new build media socket with coax, satellite etc. We bought it used so had no option to have it flood wired with Cat5/6 cable. I already replaced one module with a single RJ45 to put a PoE switch under the TV to feed the Apple TV, Virgin box and PS5. However the switch performance is limited and I was getting some issues downloading large games on the PS5.
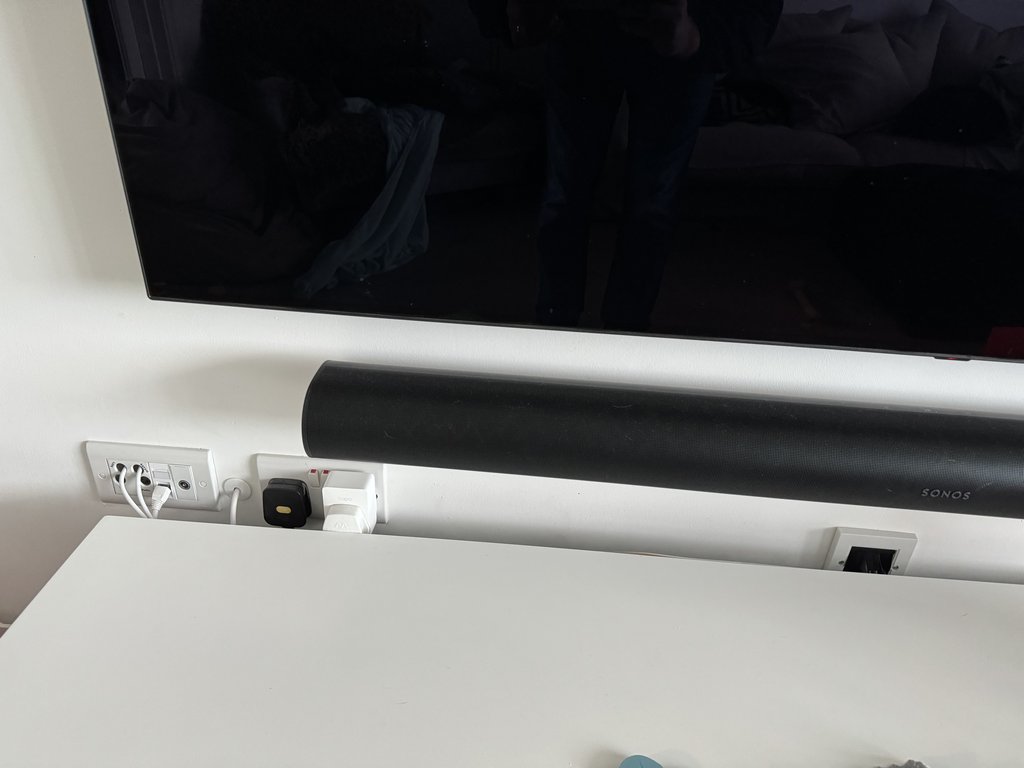
Out it came leaving enough slack in the drywall recess for the old cables to rewire it back before moving if we ever sell the house. The random drilled Coax is the VM coax to my hub. Already had 1 white cable fed to it for the old socket, hence 1x white and 3x purple (new box).
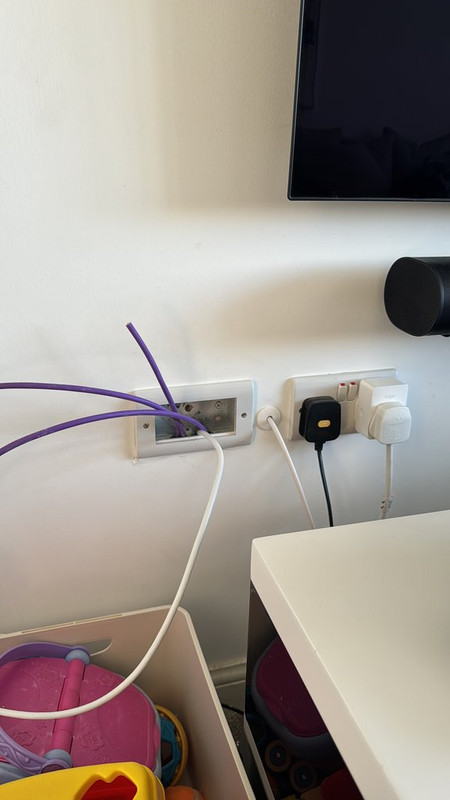
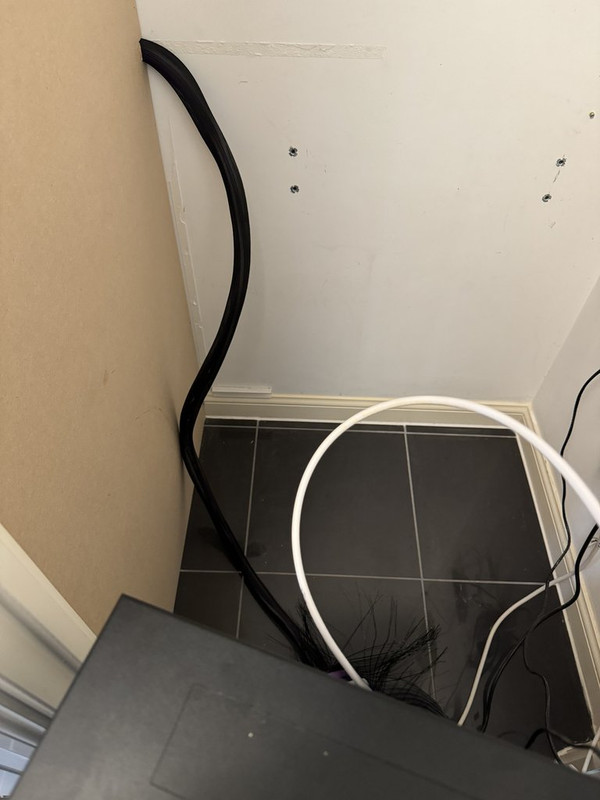
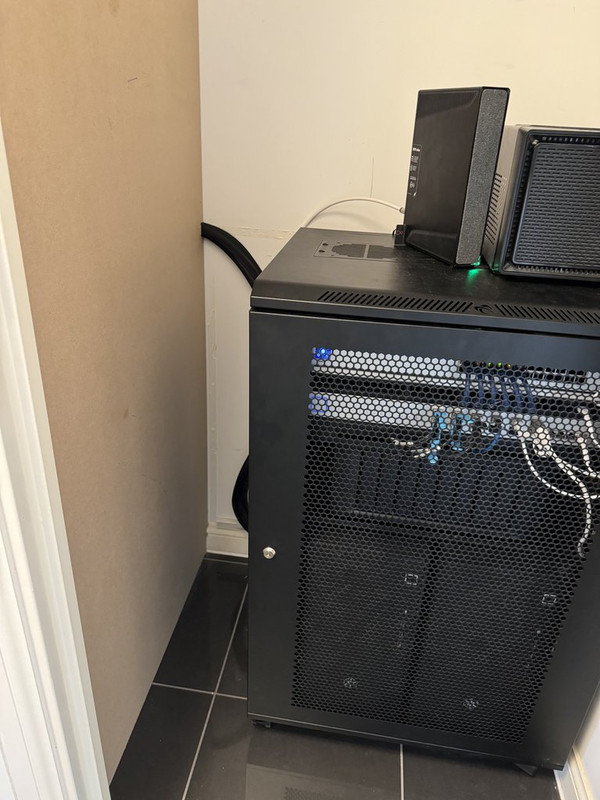
From the back of the plaster to the back of my network rack I used a braided sleeve with enough slack to the back of the patch panel. The rack is on wheels, this way I can easily take it out to clean/do work on the rack etc.
All done. One spare port if I ever want to plug a laptop in the living room, buy another console, or if I'm brave enough to plug the Sonos ARC back in (there's cabling in the drywall for it).
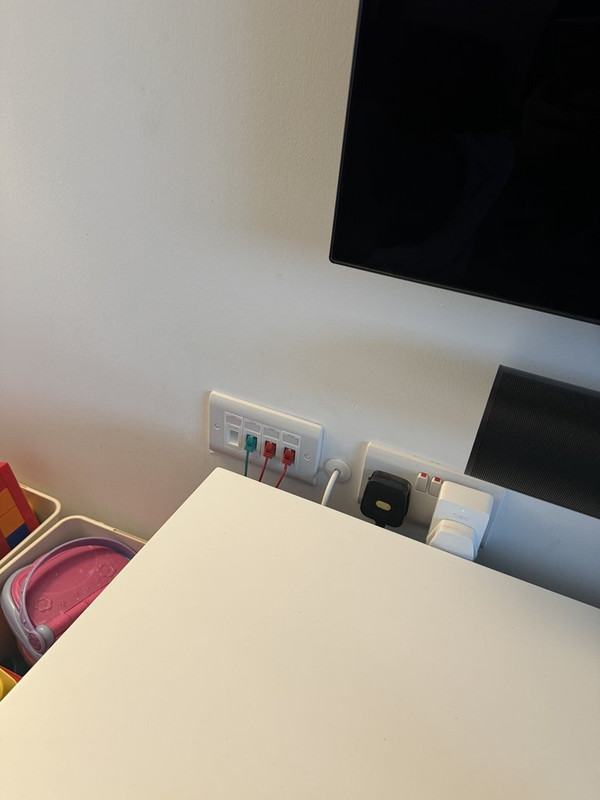
The plan next is to do similar with the braided sleeve for the runs to the AP, loft and office as they really need to be tidied up.
Out it came leaving enough slack in the drywall recess for the old cables to rewire it back before moving if we ever sell the house. The random drilled Coax is the VM coax to my hub. Already had 1 white cable fed to it for the old socket, hence 1x white and 3x purple (new box).
From the back of the plaster to the back of my network rack I used a braided sleeve with enough slack to the back of the patch panel. The rack is on wheels, this way I can easily take it out to clean/do work on the rack etc.
All done. One spare port if I ever want to plug a laptop in the living room, buy another console, or if I'm brave enough to plug the Sonos ARC back in (there's cabling in the drywall for it).
The plan next is to do similar with the braided sleeve for the runs to the AP, loft and office as they really need to be tidied up.
Last edited:
Had a bit of a nightmare with some plastering I had done, my front door can no longer open due to the boxing out of the arch now clashing with the door opening.
I think i only have 2 ways to resolve
1. shift /amend the door frame
2. Multi tool out the boxing and get it plastered back flush to the previous position so the door doesn't clash
Any other thoughts? Can see below how wide it can open..
There's options where I could route the door frame etc but it still won't be able to open wide enough to retain full functionality/opening
Before

After


Following my previous post I've cut my new plaster back so I can open my door
Now here's how far my door can open after being replastered... I'm wondering if it's worth sanding or routing the door frame in the corner it now catches or leave it...
Answers on a postcard for best way to clean plaster off a floor...


Last edited:
Now here's how far my door can open after being replastered... I'm wondering if it's worth sanding or routing the door frame in the corner it now catches or leave it...
Answers on a postcard for best way to clean plaster off a floor...
What kind of floor is it? I ended up using a scraper for any big bits and then the residue just wiped off