Advice for DIY install of bathroom and waterproofing walls - can I tile a dot and dabbed wall?

PS, this is the third room I've tiled - and while doing them I've developed my own technique that allows me to achieve a perfect result.

I think tiling looks much better if the top row is a full tile and perfectly straight - however as an inexperienced DIYer, millimetre correct measuring isn't my strong point. So I start at the top. All it takes is a bit of patience, allowing each row 15 minutes to 'grab' before moving to the next one.
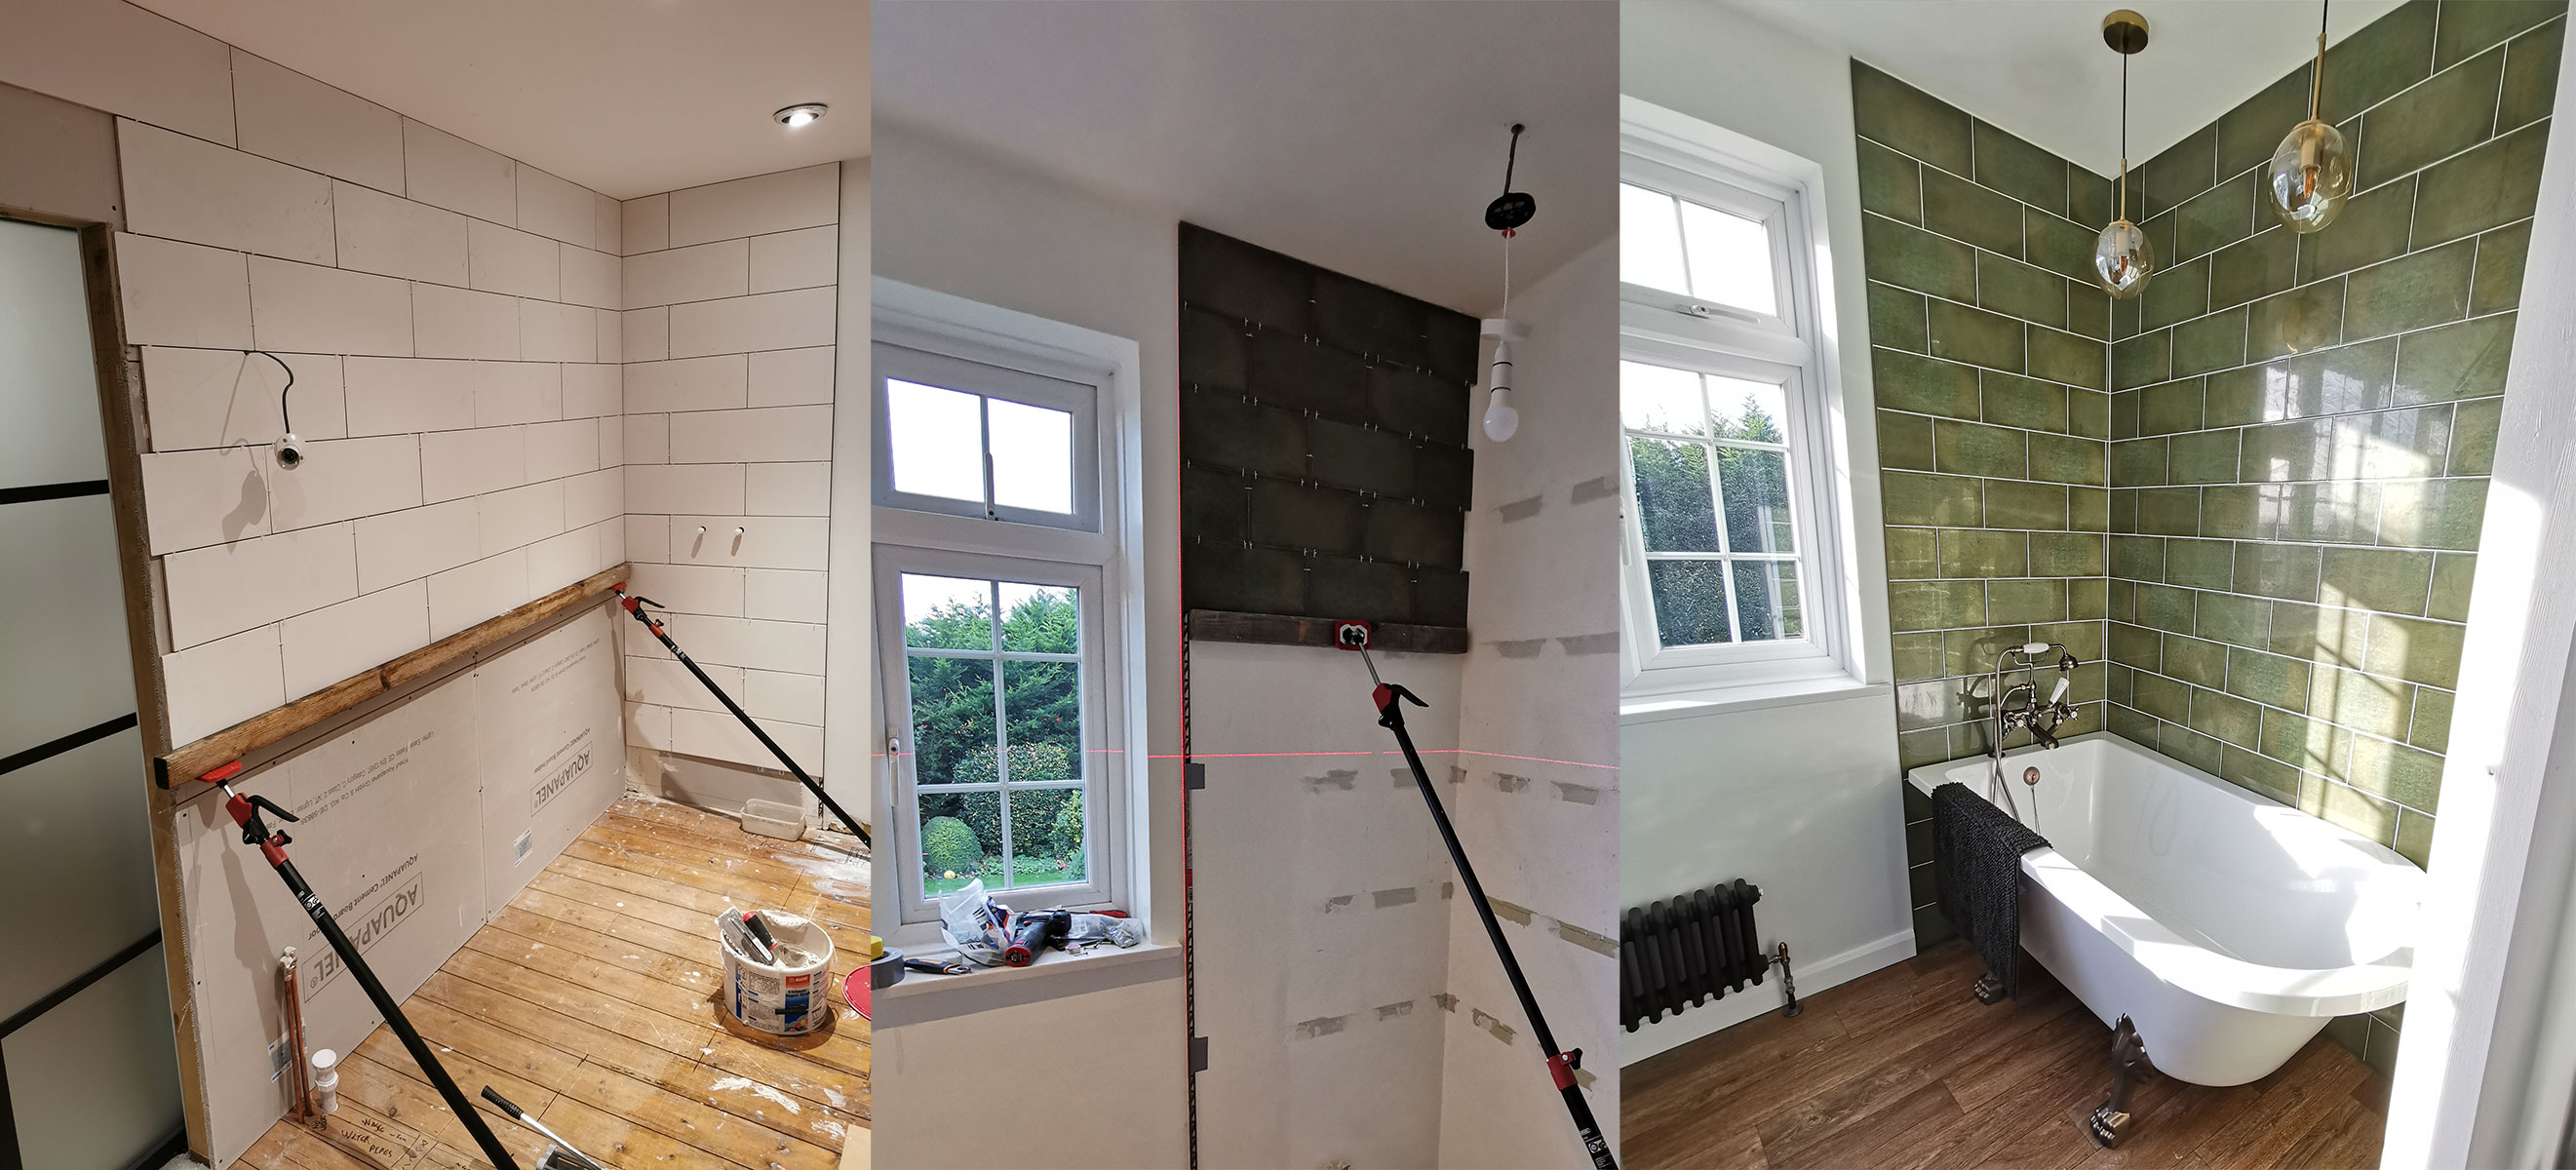
Tiling.jpg
What if the roof isn’t level? You can get the same effect by just measuring your starting point at the bottom.

Odd you have such tiny slivers in the corner too of that green one. That could have easily been avoided rather than just starting with a full tile. Should have centred that wall area but I guess you couldn’t be arsed with the extra cuts ? Looks amateur that does
 
You never start with a whole tile at the top or bottom, in fact you never start at the top that is just odd and ceilings/floors are never 100%. That slither in the corner looks awful, avoid that at all costs.
 
PS, this is the third room I've tiled - and while doing them I've developed my own technique that allows me to achieve a perfect result.

I think tiling looks much better if the top row is a full tile and perfectly straight - however as an inexperienced DIYer, millimetre correct measuring isn't my strong point. So I start at the top. All it takes is a bit of patience, allowing each row 15 minutes to 'grab' before moving to the next one.

Tiling.jpg
This needs putting in a vault somewhere :cry::cry::cry::cry::cry:

I could get on board with the slivers on the green one if the taps at least lined up with a centre line. There is a similar issue on the white one too, why such a nondescript starting point?

Edit: Whilst the going is good, you have big to big on your corners too. Tiny bit more thought and you would have had big to small.
 
Wow, didn't realise I'd joined the pro tilers forums. Perfect as in, for my own work. Every row is dead straight, every gap is exactly 2mm and the tiles are all flush.

I did have to measure that wall and there's not a lot of choice. It had to be wide enough to cover the bath and also not touch the window sill. There's about 3mm I could have gone either way. Perhaps you'd have chosen to have a perfect corner tile instead of a perfect edge tile. There was always going to be a sliver somewhere.

Having the top tile match the cieling is a personal preference. And yes it is more work.

I look forward to critiquing your work.
 
I could get on board with the slivers on the green one if the taps at least lined up with a centre line. There is a similar issue on the white one too, why such a nondescript starting point?
Taps lined up? They're attached to the bath.

The reason for the white one is out of shot. The perfect edge is lined up with where they meet the green tiles. Again I guess my preference for a perfect cieling line.
 
Whilst the going is good, you have big to big on your corners too. Tiny bit more thought and you would have had big to small.
Glad you're having fun.

You're right on that bit I guess. I started on the outsides instead of the corners. Aim was to get a perfect edge where it's more visible than where it's inside a shower cubicle. The grout on the white tiles is white, so the actual pattern is a lot less visible.
 
Funny, you liked the finished work.
You never said this on the other post :p

PS, this is the third room I've tiled - and while doing them I've developed my own technique that allows me to achieve a perfect result.
:) (and I still do really like them).
Taps lined up? They're attached to the bath.

The reason for the white one is out of shot. The perfect edge is lined up with where they meet the green tiles. Again I guess my preference for a perfect cieling line.
What I meant was (and you'll see a theme here) was when I finished my bathroom and took a step back, I was annoyed as hell I took the centre line of the wall rather than the centre line of the taps/shower controls. To have a an extra grout line and not have the centre line of the taps would annoy me *2.

Glad you're having fun.

You're right on that bit I guess. I started on the outsides instead of the corners. Aim was to get a perfect edge where it's more visible than where it's inside a shower cubicle. The grout on the white tiles is white, so the actual pattern is a lot less visible.
And here is the theme with what I said previously - I only spotted it because I made exactly the same mistake :o

The big lol was at the whole approach going bottom up and re-battening, especially if your roof is out.
 
What I meant was (and you'll see a theme here) was when I finished my bathroom and took a step back, I was annoyed as hell I took the centre line of the wall rather than the centre line of the taps/shower controls. To have a an extra grout line and not have the centre line of the taps would annoy me *2.

You can't always do it because it leaves you with slithers at the sides or odd cuts around any features , however in this case you have slithers and nothing lining up. But nice whole tile at the top :cry:
 
You can't always do it because it leaves you with slithers at the sides or odd cuts around any features , however in this case you have slithers and nothing lining up. But nice whole tile at the top :cry:
I'm still not sure what you're referring to (especially as you're quoting someone else)? If you were doing the same tiling, your priority would be to line the centre of a tile vertically with the taps attached to the bath?
 
I'm still not sure what you're referring to (especially as you're quoting someone else)? If you were doing the same tiling, your priority would be to line the centre of a tile vertically with the taps attached to the bath?

No when setting out my first priority is to try and avoid any slithers, top, bottom or on the corners, around windows, doors etc, its not always possible depending on the the tile but on yours it was clearly easy to avoid. Personally speaking tap holes not being dead central to a grout line or tile doesn't bother me but some people will demand it be done that way. Maybe @dLockers is the nightmare client all trades want to avoid :cry::cry:
 
Wow, didn't realise I'd joined the pro tilers forums. Perfect as in, for my own work. Every row is dead straight, every gap is exactly 2mm and the tiles are all flush.

I did have to measure that wall and there's not a lot of choice. It had to be wide enough to cover the bath and also not touch the window sill. There's about 3mm I could have gone either way. Perhaps you'd have chosen to have a perfect corner tile instead of a perfect edge tile. There was always going to be a sliver somewhere.

Having the top tile match the cieling is a personal preference. And yes it is more work.

I look forward to critiquing your work.
That’s all great but you are giving advice which is terrible regarding how to tile. I can have perfect tiles too and avoids awful slivers with zero downside.

You can have a full top tile if you use a tape measure too
 
Generally I dislike slivers, if your walls are out it stands out like a sore thingy

I also like if possible to "wrap round" my tiles in the corners so you have two parts that equate to a whole tile avoiding the look like with the white tiles above that seem to be smaller and larger in the corner intermittently

I would have avoided the slivers around the bath by tiling a fractionally smaller area personally.

But everyone to their own :)
 
PS, this is the third room I've tiled - and while doing them I've developed my own technique that allows me to achieve a decent result.

I think tiling looks much better if the top row is a full tile and perfectly straight - however as an inexperienced DIYer, millimetre correct measuring isn't my strong point. So I start at the top. All it takes is a bit of patience, allowing each row 15 minutes to 'grab' before moving to the next one.

Tiling.jpg

Interesting! I have one of those props from lidl. Not really used it much.

As I'll be getting a tiler in, i dont have that to worry about doing it but I would just go the mathematical route!

Before anyone highlights it yes its a hell of a maze of pipework and cables, there's also 7 different RSJs connected to this small bathroom :eek::cry:

My electrician has changed all Junction boxes to maintenance free boxes as they are no longer going to be accessible when under chipboard (also above the flanged web of a steel so completely inaccessible from the underside also!)


Today I spent all day:
  • Knocking off plaster on wall nearest my bedroom
  • Remortaring bricks which had slipped when presumably previous RSJs put in
  • Taking up floor (took a while!)
  • Knocking a support in for a new joist which was meant to support previous joist - the connection to steelwork had either come out or not been knocked in
  • Making noggin supports for old pipework which was completely unsupported
  • Putting in sound insulation (don't want to hear flush noises from upstairs to kitchen below)


DA2Gtrv.jpeg

UntreH9.jpeg

Pipe hangers

4TzbIJu.jpeg

That much coring of a steel... Why would anyone let that happen! (put in 8 years ago..)
Cng0QSs.jpeg
 
Last edited:
What do you mean? Fine as in you don't need noggins at the permineter if 400mm centred joists? I suspect the joists are going to be fairly secure as it's a very short span and supported by RSJs at multiple points

400mm with noggins, I just checked one of my old pics and they had noggins around the perimeter must've been put in by the house builders.

q4NEJxhl.jpg
 
Back
Top Bottom