Home made pizza

I get the oven upto temp then when I launch the pizza I turn it way down. Turning quite often to get an even cook and watching not to burn.

Just experiment, even when I feel like I made a right mess of the dough, launch, cooking, stretching they still end up tasting epic. :cry:
 
Good tips, thanks.

Semolina flour is definitely going to be used next time.

I really need to figure out why it ripped so easily, as everything I saw on YouTube depicted almost unbreakable glass-like pizza dough!

Notable things I did that may have caused an issue were kneeding it by hand for ten minutes (it seemed like it had been kneeded enough in that it became more firm and less sticky), letting it prove for 2hrs on a warm window sill, not knocking it back, not giving it a second prove, and reducing the hydration with the amount of flour I had to add during stretching and putting in the oven.

I use a wood peel to launch, I rub flour into the peel and then a dusting of semolina flour, I find this works well, I did muck a pizza up the over day though, took too long topping the pizza on the peel or maybe my base split as I launched it, as I did make it a little thin.
But generally flour and semolina has worked for me.
 
Yeah tried semolina on the wooden peel today and it was much better.

I also used a stand mixer for kneeding the dough and let it prove overnight in the fridge. Much better.

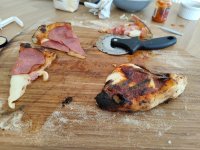
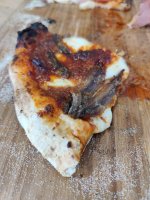
Today's effort was a flavour packed surf and turf, nduja and anchovies.

F75xg2Wh.jpg

7bqRQnsh.jpg
 
Don't ask me why on today of all days we decided to do pizzas but anyway.

IMG-20220717-173737.jpg


IMG-20220717-175640.jpg


IMG-20220717-175927.jpg


IMG-20220717-180152.jpg


IMG-20220717-180954.jpg
 
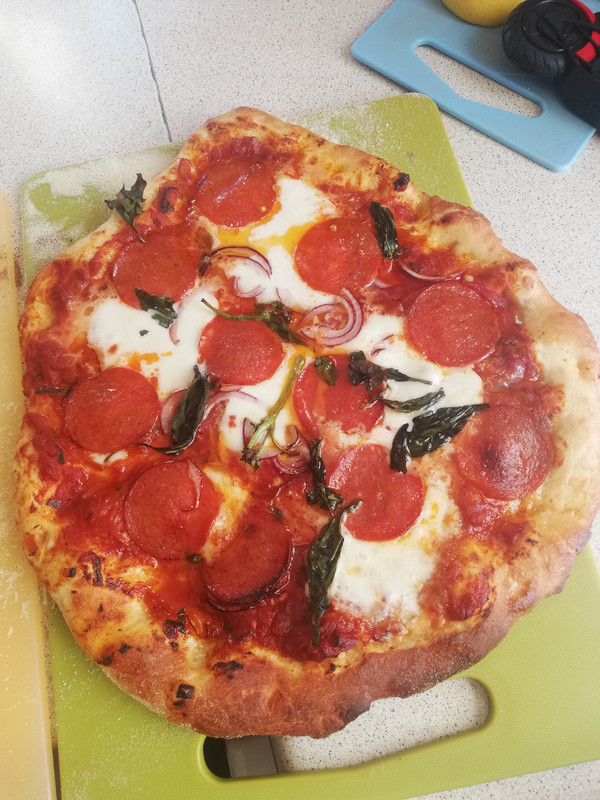
Pepperoni, jalapenos and sweet piquant peppers done on the weber, this was the 4th one I had done so had lost a bit of temp to get the crust nice and brown.

 
What scales are you guys using to weigh out the small amounts of yeast

Just wondered if some are more accurate than others even if they do 0.00 of a gram
 
Just search for some 'digital gram scales', loads of options out there and you don't need to spend a lot of money. They are the same kind of scales your local dealer will use if you need a recommendation :p.
 
I started to build a pizza oven at the beginning of the pandemic, it took a lot longer than expected but eventually I got it to a useable stage.
It needed a few months to dry out and aesthetically it still needs a bit of work, by this time bad weather was approaching so I tarped it up and forgot about it for 2 years.

With all this nice weather I've finally got round to firing it up and enjoyed pizza Friday for the last 3 weeks!
This was the first attempt at cooking in it, I didn't quite have the oven temp high enough but every week the results have got better and I'm now down to a 2 minute pizzas.

I've done roasted peppers, corn on the cob, spicy potato wedges and a banana loaf so far, all of which tasted amazing.

I have a door to seal the oven but I still need to make a plug for the chimney so I can do some retained heat/slow cooking, and I still need to make it look pretty but I'm pleased with how it's working.


Oh can any one recommend a budget friendly all metal 9" pizza peel, my wooden one literally caught fire putting it in the oven :(
 
Just search for some 'digital gram scales', loads of options out there and you don't need to spend a lot of money. They are the same kind of scales your local dealer will use if you need a recommendation :p.

I have a set of those for reloading ammunition, as you need to be pretty precise with how much powder you add to each cartridge.

But yes, also for that lol.
 
I started to build a pizza oven at the beginning of the pandemic, it took a lot longer than expected but eventually I got it to a useable stage.
It needed a few months to dry out and aesthetically it still needs a bit of work, by this time bad weather was approaching so I tarped it up and forgot about it for 2 years.
...

Oh can any one recommend a budget friendly all metal 9" pizza peel, my wooden one literally caught fire putting it in the oven :(
That is damn cool, have you got a build log / more pictures?

As for metal peels, I and a couple of others have this one from Amazon and it's really good.

Blumtal Pizza Peel - Long Wooden Handle with Aluminium Peel, Shovel 12 inch x 12inch, 33.5inch Long Pizza Paddle https://amzn.eu/d/cAXRje5

Unavailable and not 9" :p but I'm sure there are similar replacements.

Holes vs. no holes I think comes down to weight, stickiness, and dropping flour / semolina through the holes.
 
Thanks for the recommendations guys I'll look into them, ideally after a 9" peel as that's the size of pizza I tend to make and it can double up as a turner as well.

I'd wanted a pizza oven for ages and initially looked into the Ooni ovens but after a lot of research and the help of the Forno Bravo fourm decided to have a go at building one.

The first challenge was space and size, the reason I was interested in the Ooni oven was it's compact size. I didn't think I had room for a full blown brick built oven, which start around 28" internal size, far to large for my tiny garden. I then found out about cast ovens (not these perlite ones all over youtube, they are bad) which allow for smaller sizes and easier building but there are trade offs.

One of the main points to having a brick oven is so you can use the retained heat after firing for pizza to use as a regular oven. Large ovens can stay hot enough to cook in for several days.
The down side to a smaller oven is less mass so it wont retain heat for nearly as long, as well as fitting less inside. There is also a problem of chimney placement, traditionally the chimney is placed in front of the chamber as this draws hot air around the dome, down then out of the chimney. This circulation of hot air radiates heat onto the floor of the oven which is essential for cooking, especially for pizza.

One plus point of a smaller oven is it heats much quicker and uses far less fuel.

In the end I had to trade off some functionality for size, I wanted to use fire bricks in the built to try and achieve some level of retained heat cooking and went down the unusual route of using fire bricks and clay casting to build an oven with a 22" internal size, about as small as you can go with a brick oven and about as small as you'd want to go for an outside oven.

Starting with the fire bricks. I cut them to shape with a diamond blade on a grinder. Hard work even with the grinder as they are very tough.
Ideally cut with a wet saw as the dust is full of silicate and other nasties, very bad for the lungs.

If it was going to be a full brick build the outer bricks would also need to be bevel cut so they are close fitting to avoid heat loss. As I was using clay I could fill the voids with it and it saved a lot of work.
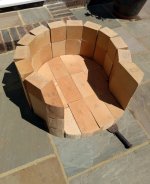
Xdmb3v0.jpg

I made a base with concrete blocks which I plan on cladding later to smarten up. The oven then sits on 4.5" of insulation. Consisting of a insulated cement board, perlite/cement mix, and finally 1" of calcium silicate board. This floor insulation is critical, if not used heat loss through the floor bricks would make the oven practically useless. (this is one of the reasons why the perlite youtube ovens fail)

The outer fired bricks of the oven are set in place with a clay, lime, stainless steel reinforcing needles and cement mix. This is also the same mixture that will create the dome.
I started on the mould for the dome with polystyrene and sand
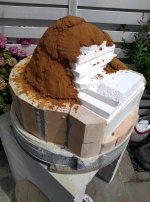
2NSMmXd.jpg

With the dome mould done and the chimney temporarily in place, I covered it in cling film so I can use it while casting the dome to get a perfect fit.
First trade off of this small oven design, I brought the chimney as far forward as possible, ideally it would be further forward for the reasons mentioned above but the oven size limited this.
Will have to wait and see how it performs.
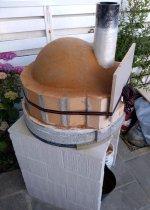
E9esdTi.jpg

The sand dome mould was then covered in newspaper and 3" of the clay mix was compacted over it. once the clay mix was dry enough the sand/polystyrene can be removed leaving the formed dome set in place.
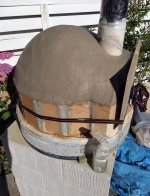
a3r80Cj.jpg

The whole oven was then covered with 2" of ceramic fibre insulation blanket, another critical step to help retain heat.
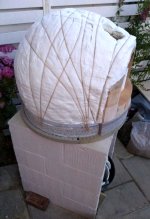
A71r2eH.jpg

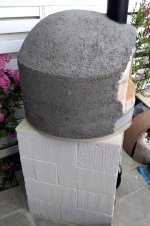
The blanket was then covered with a perlite, vermiculite, lime, reinforcing needle, cement mix to add strength and a further layer of insulation.
6Wp18z1.jpg

And this is where the project came to a halt. It was no where near finished but was nearly at the stage where it could be used. It had been a few months work up to this point and my enthusiasm was starting to dwindle, It had been much harder work than I had anticipated and the stresses of the pandemic and lock down where starting to show on myself and family.

So I wrapped the project up and took a step back.

Fortunately because of the amount of cement and thus water in the build it would take many months before it was dry enough to fire up.
You can dry them out faster by starting small controlled fires but there is a risk of heating the dome too fast tuning all that water to steam, cracking the dome which potentially could cause huge heat loss issues. I needed a break and was happy to wait a few months for it to dry naturally, that few months turned into nearly 2 years.

My interest was sparked again when a friend recently got an Ooni and was telling me about it, I'm really glad it has. It's great fun firing up the oven with a beer and it does make excellent pizza.

I've had a busy weekend and made a indoor pizza and the difference is huge.
Thankfully it seems to be performing well too. It does take at least 1 hour to get the floor bricks up to pizza cooking temp but I don't think that's to bad, I char the peppers and cook the toppings in that time.

In hindsight if I where to build it again I would lengthen the entrance to bring the chimney forward and reduce the dome height by a couple of inches. that would help to heat the floor slightly quicker.

It also seems to be retaining heat well. I made a quick door and cover for the chimney and the next morning after making pizza the oven was still hot enough to cook in, though I suspect I'll only get 24 hours max out of it. Trade off for it's size but I'm happy with that.
I've cooked a banana loaf and pancakes the next morning.

All that's left is to make a proper door and chimney plug and make the thing look respectable :)

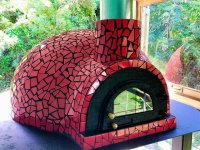
I plan to clad the lower base, maybe with tiles or stone and cover the whole dome in a mosaic style
Something like this
dyf7Ymx.jpg

I might get it finished in the next 2 years :)
 
Thankfully it seems to be performing well too. It does take at least 1 hour to get the floor bricks up to pizza cooking temp but I don't think that's to bad, I char the peppers and cook the toppings in that time.
excellent, what i did in lockdown, project ...
no pictures yet of it cooking a pizza - , as you say an hour heat up seems reasonable, what mass of wood do you use ... the oven probably takes 30mins to get stone up to 240

The dome is some special clay mix ... looks like pottery clay ? which ultimately gets fired from the heat ?... what's the surface the pizza actually sits on .. tiles ?
 
The dome is some special clay mix ... looks like pottery clay ? which ultimately gets fired from the heat ?... what's the surface the pizza actually sits on .. tiles ?

Yeah exactly that, I can't remember which specific clay it was mind. The pizza sits directly onto the fire brick floor.

I'm using thin pieces of dried oak for fuel. thin bits burn quicker and hotter but create less smoke, just have to be on hand to add more regularly. Very little ash left at the end though so clean up is easy.
 
Tried doing pizza using a poolish starter on Saturday and I think it was the best dough I've made so far. Probably 7th or 8th time making my own dough.

Made 9 dough balls I think.

Poolish - combine and mix thoroughly, leave for 4 hours at room temp
400g water
400g '00' 15% flour
6g instant yeast
10g honey

Dough
1kg '00' 15% flour
600g water
30g salt
Poolish from above

Combine all the dough ingredients, give it a rough knead/stretch and let it autolyse for an hours. Then another stretch and some slap and folds until it goes nice and smooth and you can feel it's extensible. Bulk ferment at room temp for another 2 hours.

Split into 200g doughballs, into the fridge overnight. Take out of fridge 30 mins before making pizza.

Best part about it is that you can do it the day before and on the day just take them out of the fridge. Worst part is it takes up a heck of a lot of fridge space.

This one actually had the worst crust but is the only one I took a close up of


Some bonus sourdough that I thought would be good to try in the pizza oven rather than the usual. Worked OK.
 
Hi i have been using a breadmaker for years to make my dough, i make the dough and place in bag and into fridge, then take it out a couple of days later and let sit for a few hours and sometime it is so elastic it just wont stretch, any help on this ?
Thanks
 
Back
Top Bottom