Robocain - Robocop 2 robot

the rifles use the mechanics from a airsoft pistol iirc so doubt they will be that powerful :p

the Walther WA2000 uses the mechanism from a Western Arms 1911, but with a very long barrel. it's probably firing at about 450 to 500 FPS because of that.

the Unique Alpine TPG-1 uses the bolt-action mech from, i think, a KJW-M700, it too should be very powerful

i think the DSR-1 uses another M700 mechanism, but customised so that the bolt handle is at the front of the bolt.

when using gas in airsoft guns with long barrels, you get high FPS's because the long barrel gives the gas the opportunity to expand fully, accelerating the BB all the way.
 
AOD has said nothing but fact, well done.

As my guns are based on an existing weapon its classed as a modification to that weapon, like a big body kit if you will.

yes the barrels extend as far as the outer barrel allows, I have a chrono they are all bellow 500fps.
 
Well an hour later. The gap is only 3mm so I have to cut 10mm (i think) down using a 3mm cuttter, the 3mm mill is quite delicate so I

have to take light cuts so as not to clog the cutter. So something like .3mm per cut, so thats 30 passes per U bracket, times 8 brackets

is.... tum tee tum 240 passes.

DSC08637.JPG


now drilled them all sides and bottom

DSC08638.JPG


got some material for the cylinders.... im not 100% on this, it looks a bit thin, the detail on the cylinders is crazy, im not sure there

is enough room

DSC08640.JPG


turing away

DSC08641.JPG


cutting the rod first for a trial fit

DSC08644.JPG


cylinder

DSC08645.JPG


oh dear :( my initial suspisions are realised , after adding the 4 screws there is no material for the 2 verticle screws and it does look
too small, which I suppose is a good thing.

DSC08647.JPG


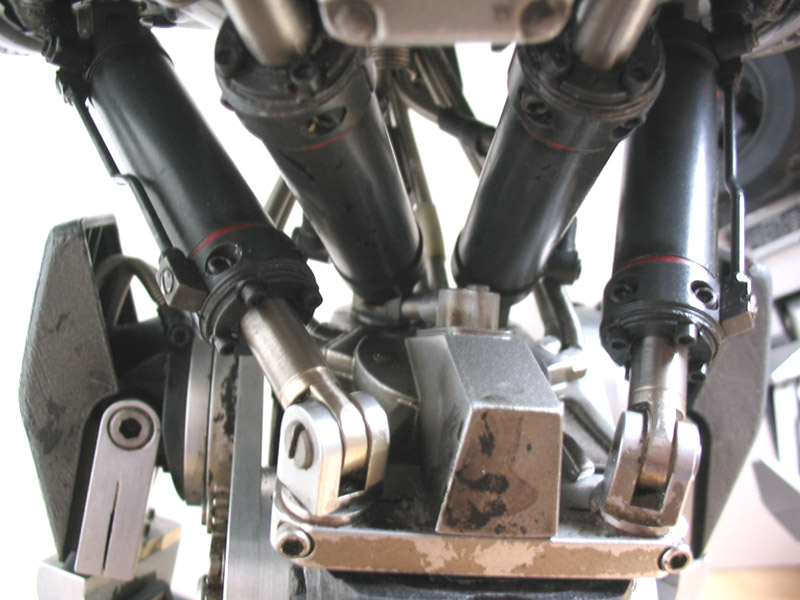
pic of the real thing for reference:

cainref1.jpg


while I wait for thicker rod to be delivered i'll get on with a left leg bit.

DSC08648.JPG


a lot easier with one to copy

DSC08649.JPG


finishing off the other thigh

DSC08650.JPG


cold up the garage the other night, didnt help the gas in my heater ran out :( brrrrrrrrrr

DSC08651.JPG


easy when there is a part to copy

DSC08652.JPG


center it up with a little pointer i made.

DSC08654.JPG


then take it round

DSC08656.JPG


nearly there, just the easy bits to do.

DSC08657.JPG


boring the holes in the sides and drilling and tapping everything

DSC08659.JPG


turned the other spacer and there we are

DSC08660.JPG


gave myself a big pat on the back for getting this hard bit out the way for good.

DSC08661.JPG
 
thanks

Ok got the material for the cylinders, this "feels" right, progress will apear slow on these for 2 reasons. 1, I have to do 4 of these the same, so each operation has to be replicated 4 times and 2 I have to make a note of every measurement so I can get each one exactly the same.

drilled a deep hole for the rod to move in.

DSC08663.JPG


put the 2 steps in.

DSC08664.JPG


one thing I learnt from the 1st one I did wrong is that no matter how carefully you clamp it your gonna get marks, so I am purposfully using a piece of rod that is 1mm too fat, then ignoring the extra 1mm (0.5 each side) in my measurements, so at the end I will have a finished cylinder that I can then turn down for a perfect finish.

for scale the milling cutter here is 3mm

DSC08665.JPG


all done here, 4 x 3mm countersinks with 1.7mm holes per cylinder AND the 2 verticle holes that I couldnt fit before.

DSC08666.JPG


cutting the flat on the other end

DSC08667.JPG


taking off the additional 0.5 form the ends and 1 or 1.5 I cant remeber form the middle of the cylinder to leave the flawless (hopefully) finish.

DSC08668.JPG
 
Not sure yet, probably just painting, duraility wont be an issue it not like its going to be handled....... ever :D

Thanks again for the praise from you all, its a great help .

main bits done and all the same,

DSC08669.JPG


one of the 4 rods, had to start with 8mm rod then turn the whole length down to 6mm and test fit in the cylinders until it was perfect, then trim the 8mm end and round it off

DSC08674.JPG


the m2 screws are still a bit too big to fit so I had to turn the heads down from 3.7mm to 3mm so they sit in the recess. 6 per cylinder, 24 screws to turn down.

DSC08675.JPG


then tap all 24 holes with M2 thread and were starting to look like it

DSC08676.JPG


then whilst drilling one of the U brackets I did somthing silly and took another whack on my previously damaged thumb, good grief, thats enough for today i think :(

DSC08677.JPG
 
Anymore updates?

of course

I managed to get the right screws for the U brackets :)

DSC08678.JPG


had to drill, tap and recess each one

DSC08679.JPG


...and finish the other rods off, I have also put a tiny line where the rod meets the flat bit, too shallow to see here really.

DSC08680.JPG


first one drilled and in, still a bit of work to do on the cylinders yet, I need to make the high pressure pipe work.

DSC08681.JPG
 
Back
Top Bottom